Looking for the perfect appetizer? You have to try these scrumptious, savory Cheese Truffles ... these Mini Cheese Balls are easy to make and so irresistible!

This post contains affiliate links. As an Amazon Associate I earn from qualifying purchases.
As a former Wisconsinite, my love for cheese runs deep. I could probably live on cheese and crackers, and you wouldn't have to twist my arm!
So when I started thinking about holiday recipes, I knew that one of them had to be a cheesy appetizer. And with everything going on this year, I wanted to keep things fairly simple and low key. So Cheese Truffles (aka Mini Cheese Balls) it is!
This recipe is a slightly more sophisticated take on the classic cheese ball. But while these Cheese Ball Bites may look fancy, they're actually very simple to prepare, not to mention fun to eat. And no one, I repeat no one, can resist them!
I showcased three of my go-to cheeses in these bite sized bits of bliss, but the recipe is quite flexible. Just follow the basic directions, swapping in your fave cheeses, seasonings, and coatings. It's so easy, and I'm sharing tons of tips and ideas below ... keep reading for the full scoop!

Ingredients
This recipe is packed with so much flavor that you may be surprised how simple the ingredients are! I created three different varieties for this recipe, but the actual formula is pretty basic.
Here's what you'll need:
- Cream Cheese - This creamy cheese is the "glue" that holds these bites together. I'd recommend using full fat cheese for the tastiest results (c'mon, treat yourself!). If you'd prefer to use something lower fat, then try using Neufchâtel cheese.
- Other Cheeses - To flavor these cheesy bites, you'll need another cheese to pair with the cream cheese. I used sharp cheddar, goat cheese, and blue cheese, but other varieties work, too. Check out my tips below for more ideas.
- Seasonings - I kept the flavoring very simple here, pairing the cheddar balls with garlic and cayenne (optional if you don't like spicy foods) and the blue cheese balls with garlic.
- Coatings - The coatings are the fun part of this recipe! I used two different nuts, as well as a combination of dried cranberries and orange zest (perfect for the holidays!). The sky is really the limit as far as coatings go, and I'm sharing more ideas below.
- Pretzel Sticks - For an optional finishing touch, insert a pretzel stick into your cheese balls to add a handle.
You'll Also Need
To make this recipe, get out your stand mixer (or hand mixer) to mix everything together. You'll also need a baking sheet or a large platter, as well as parchment paper to line the baking sheet (less clean up later!).

How to Make Cheese Truffles
This delicious appetizer couldn't be easier to make! You'll find a detailed recipe card below, but here's an overview of the steps:
- Mix cream cheese. You'll start by mixing the cream cheese, salt, and any other dried flavorings (like garlic powder) in a stand mixer (or with a hand mixer) until the cream cheese is smooth. Tips: Make sure to start with room temperature cream cheese, otherwise it won't blend properly. And don't go crazy with the salt. Cheese is already pretty salty, so just a pinch will do!
- Add the flavoring cheese. Next, you'll add the flavoring cheese, which should be shredded or crumbled (depending on the cheese) first. I created three flavors for this recipe: one with cheddar cheese; one with blue cheese; and one with goat cheese. Continue mixing just until the cheese in incorporated ... I prefer these balls to have a little texture.
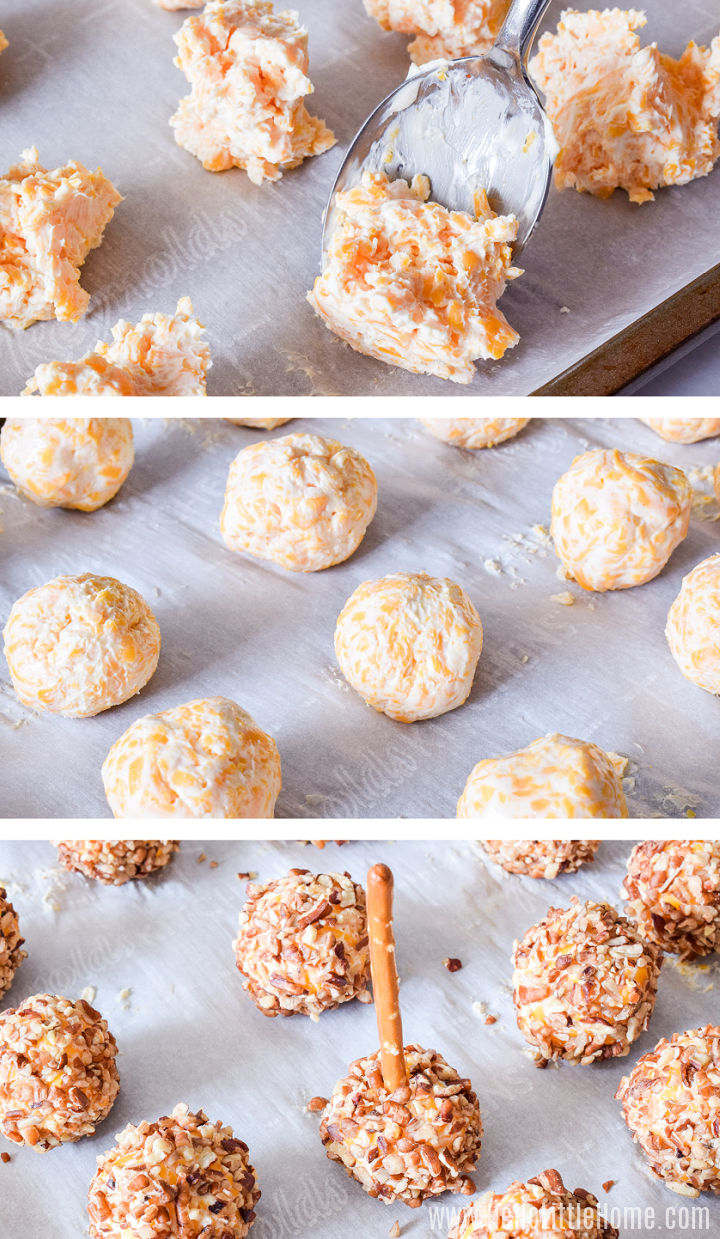
- Divide mixture into individual portions. Once everything is combined, use a tablespoon to scoop out about one tablespoon of cheese. Place the cheese on a parchment lined baking sheet, then repeat this process with the remaining cheese. You should get about 20 to 22 scoops or so, depending on the size of your scoops.
- Roll into balls. Place the cheese mixture between your palms and roll to form a ball. If the mixture sticks to your hands too much, wet them with water very lightly. Tip: If the cheese is too soft to roll into a ball, pop it into the refrigerator for about 30 minutes.
- Add coating. To finish the balls, roll them in your choice of coating, pressing gently so it sticks. If you'd like to add a pretzel stick, do so now. Then, refrigerate the cheese balls until you're ready to serve them.
Wasn't that easy? You and your guests will be enjoying these Savory Truffles in no time!

Flavors Combinations
Cheddar Cheese Balls
These balls combine the cream cheese with sharp cheddar (yellow and white cheddar will both work, but shred it yourself for best results), plus a little garlic powder (sub one fresh clove, if you prefer) and cayenne (optional). A classic combo!
Once you've finished the balls, roll them in the pecans. I used pecan bits, which are very finely chopped pecans (look for small bags in the baking aisle by the nuts). If you can't find the bits, just mince up some pecan halves (a nut chopper or food processor works great for this) ... the smaller the nuts are, the better they will stick to the cheese.
Other coating options: feel free to use different nuts (walnuts would be tasty), as well as fresh herbs, such as minced parsley or chives.

Goat Cheese Balls
This was my husband's favorite, and he doesn't even like goat cheese! I used a goat cheese log (the type many grocery stores carry) to make it. The mixture is pretty soft, so after scooping out the cheese, refrigerate it for half an hour before rolling. Dry hands will work best here: unlike the cheddar mix, I found that these balls became too slippery to roll with wet hands.
For the coating, you'll use a combination of orange zest (use a classic citrus zester or a microplane zester) and minced, dried cranberries, too. Make sure both are finely chopped before you combine them, and don't worry if the Goat Cheese Truffles have a few white spots showing when you're done rolling them.
Other coating ideas: the cranberry orange coating here is super delicious and festive ... perfect for holidays like Thanksgiving and Christmas! You could also experiment with nuts, such as pecans or walnuts, as well as fresh herbs, such as chives or parsley. Or you could add the cranberries and zest right to the cheese mixture, then roll the balls in nuts instead.

Blue Cheese Balls
Blue cheese lovers, this one is for you! For this combination, use your favorite blue cheese, like roquefort, gorgonzola, stilton, etc. I used a Danish blue cheese. You'll also add a little garlic powder (or one clove fresh garlic). Like the goat cheese, this mixture is on the softer side, so refrigerate before rolling with dry hands.
This coating is made from pistachios ... isn't the vibrant yellow-green color gorgeous? You can finely chop the pistachios with a food processor (some of the nuts will be almost powdery when done), or you can mince them by hand (you might need extra nuts since the pieces will be larger). Start with shelled pistachios to save some time!
Other coating ideas: try different nuts, like walnuts or pecans, with these Blue Cheese Balls. The cranberry orange coating used for the Goat Cheese Balls would also be delish, adding a sweet counterpart to the sharp cheese. Or you could use fresh herbs, like minced parsley.

How to Add Pretzel Stick Handle
I served most of these Cheese Truffles without pretzels, but I added a few so you could see what Mini Cheese Balls with pretzel sticks look like. They definitely makes it easier for people to grab and look pretty cute, too.
Add the pretzel sticks after rolling the balls in the coating. Then, you can gently press them back into shape if needed. Make sure to refrigerate the balls after inserting the sticks so they stay in place.
The pretzel sticks do get soggy in the fridge, so I recommend making the balls the day they will be eaten if you use them.

Storage
Store these Cheese Balls in an airtight container in your refrigerator. If you're using dry coatings, like nuts, they will last about a week ... just keep in mind that your coatings will not stay crisp. Pretzel sticks will get soft after a day, and even the dried cranberries will soften after a day. Fresh herbs will only last a day or two at most.
These Savory Truffles can also be frozen for about a month or so. I'd recommend freezing them on a baking sheet first, then transferring them to an airtight container or ziptop bag once frozen. Again, dry coatings like nuts freeze best (the cranberry orange coating also freezes well). I'd avoid freezing fresh herbs. Defrost in the refrigerator for three to four hours before serving.
Another option if you want to make these ahead of time ... shape the balls, then refrigerate / freeze them without the coatings. Then, roll them in the coating on the day you plan to serve them.
Variations
This recipe is super simple ... basically, you are pairing eight ounces (one cup) of cream cheese with eight ounces (two cups) or shredded or crumbled cheese. Feel free to experiment! Here are some easy ideas:
- Cheeses - The cream cheese can be paired with almost any flavorful cheese, such as feta, gouda, pepper jack, provolone, smoked cheeses, or Swiss, to name a few. Avoid processed cheeses, hard, rubbery, or dry cheeses (which will affect the texture), and anything super creamy, like mascarpone (which is too soft).
- Seasonings -There are so many fun options when it comes seasoning this recipe! Try using fresh citrus zest, minced hot peppers (like jalapeños or chipotles), hot sauce, ranch dressing powder, finely chopped olives, sun-dried tomatoes, or pimientos, taco seasoning, fresh or dried herbs, or spices (like chili powder, smoked paprika, or curry powder). Anything you might use as a coating (nuts, dried fruit, etc.), can most likely be incorporated into the cheese mixture, too.
- Coatings - The creative coatings are my favorite part of this recipe ... they add a beautiful finishing touch and lots of flavor. Try experimenting with other toppings, such as your favorite minced nuts or dried fruits, whole sesame seeds or pine nuts, crushed pretzels, minced green onions, or finely chopped fresh herbs (like flat-leaf parsley, chives, or dill). You could also use lemon or lime zest, dried spices (like chili powder or curry powder) and even seasoning mixtures, like taco seasoning or Everything but the Bagel.

What to Serve with Mini Cheese Balls
While these Bite Sized Cheese Balls are delicious as-is, I like to pair them with crackers. There's enough cheese in each ball to spread on three to four crackers ... or two crackers if you're my husband!
I served mine with two different types of crackers. They'd also be tasty with my homemade Herb Parmesan Crackers, Crostini, or small slices of crusty artisan bread.
With any sort of cheese appetizer or cheese plate, I also like to serve some sort of fruit as a counterpoint to the heavier cheese. I used grapes here, but apple or pear slices, or even dried fruit, would also work.
I served the finished recipe on a marble tray, but any kind of tray works. You could even serve them in individual appetizer dishes, like these adorable heart-shaped bowls!

Related Recipes
Look for more appetizer ideas? Here are some other cheesy recipes to inspire you:
- How to Arrange a Cheese Plate
- Blue Cheese Stuffed Dates
- Baked Feta with Tomatoes and Olives
- Tomato Bruschetta with Ricotta
- Feta Stuffed Peppers
- Baked Brie with Cranberries and Pecans
- Parmesan Pepper Popcorn
- Baked Ricotta
- Fromage Fort Cheese Spread
- Pull Apart Christmas Tree Pastry


Cheese Truffles
Ingredients
For Cheddar Cheese Balls:
- 8 ounces cream cheese, at room temperature (1 cup)
- ½ teaspoon garlic powder
- ¼ teaspoon cayenne (optional)
- pinch kosher salt
- 8 ounces sharp cheddar cheese, shredded (about 2 cups)
- 1 cup pecan bits
For Goat Cheese Balls:
- 8 ounces cream cheese, at room temperature (1 cup)
- pinch kosher salt
- 8 ounces goat cheese, crumbled (about 2 cups)
- 1 ⅓ cups dried cranberries, minced
- 2 teaspoons minced orange zest (from 1 large orange)
For Blue Cheese Balls:
- 8 ounces cream cheese, at room temperature (1 cup)
- ½ teaspoon garlic powder
- pinch kosher salt
- 8 ounces blue cheese, crumbled (about 2 cups)
- ⅔ cup shelled pistachios, ground or very finely minced
For Serving:
- crackers
- fresh fruit
Instructions
Cheddar Cheese Balls
- Using a stand mixer (or hand mixer), mix cream cheese, garlic powder, cayenne, and pinch salt until smooth.
- Add cheddar, then continue mixing just until incorporated.
- Line a baking sheet (or serving tray) with parchment paper. Using a spoon, scoop out 1 tablespoon of cheese mixture, then drop onto parchment. Repeat with remaining mixture.
- Lightly wet hands, then roll cheese into balls. Place pecan bits in a small bowl, then roll balls in pecans until coated.
Goat Cheese Balls
- Using a stand mixer (or hand mixer), mix cream cheese and pinch salt until smooth.
- Add goat cheese, then continue mixing just until incorporated.
- Line a baking sheet (or serving tray) with parchment paper. Using a spoon, scoop out 1 tablespoon of cheese mixture, then drop onto parchment. Repeat with remaining mixture.
- Refrigerate cheese on baking sheet for ½ hour, or until firm enough to handle. Then, use hands to roll into balls.
- Combine cranberries and zest in a small bowl; mix well. Roll cheese balls in mixture until mostly coated.
Blue Cheese Balls
- Using a stand mixer (or hand mixer), mix cream cheese, garlic powder, and pinch salt until smooth.
- Add blue cheese, then continue mixing just until incorporated.
- Line a baking sheet (or serving tray) with parchment paper. Using a spoon, scoop out 1 tablespoon of cheese mixture, then drop onto parchment. Repeat with remaining mixture.
- Refrigerate cheese on baking sheet for ½ hour, or until firm enough to handle. Then, use hands to roll into balls.
- Place ground pistachios in a small bowl, then roll cheese balls in pistachios until coated.
Serving
- Refrigerate Cheese Truffles until ready to eat. Serve with crackers and fresh fruit (such as grapes). Enjoy!
Video
Notes
Nutrition
