This shop has been compensated by Collective Bias, Inc. and its advertiser. All opinions are mine alone.
This DIY Award Ribbon is so fun and easy to make. It's the perfect addition to your next family game night or for any competition prize!

This post contains affiliate links. As an Amazon Associate I earn from qualifying purchases.
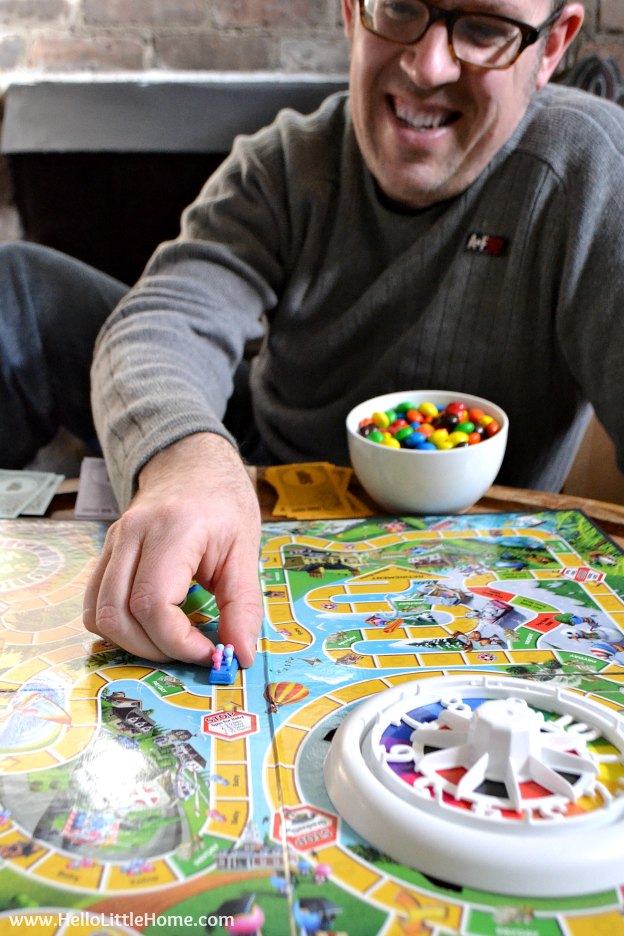
I've loved playing board games ever since I was a kid. It's such a fun, relaxing, and affordable way to enjoy a night at home!
Now that I'm older and married, one my favorite date night activities is staying in for a game night.
It's the perfect way to spend time together, especially on rainy or snowy days or anytime we just want to kick back at home.
One of my favorite things ever is hosting a game night party. And this DIY Award Ribbon is the perfect way to add a fun prize to the competition!
Even if you're not into games though, this homemade prize ribbon is great for any competition.

DIY Award Ribbon for Game Night
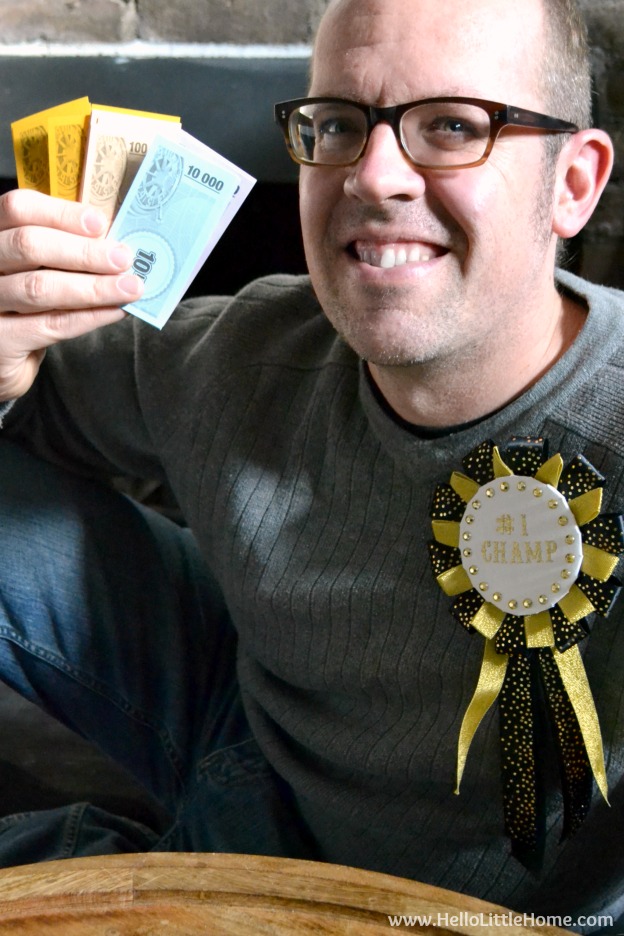
My husband and I tend to be very competitive when it comes to game night.
Years ago, we had a hand drawn champion certificate that we passed back and forth, depending on who won the game. It was very silly, yet very fun to receive!
I came across that certificate just before our latest game night, and it inspired me to create this Game Night Champion Ribbon.
The prize ribbon turned out so cute, and I was excited to see who would claim it first!
Alas, I was not the winner.
Joel beat me fair and square, but there is always next time, right?

Whether you win or lose, this DIY Game Night Champion Ribbon is the perfect addition to your family game night, too.
It's simple to put together, and you probably already have many of the supplies.
Have fun with it! With a project like this, the more outlandish it turns out, the better!
Tip: if you are playing with young kids who don't like losing, make a few ribbons. These ribbons really are quick to make, and you'll be able to avoid the tears. Customize the ribbons with different message (Best Team Player, Best Banker, Best Strategy, etc.), and then hand them out at the end.
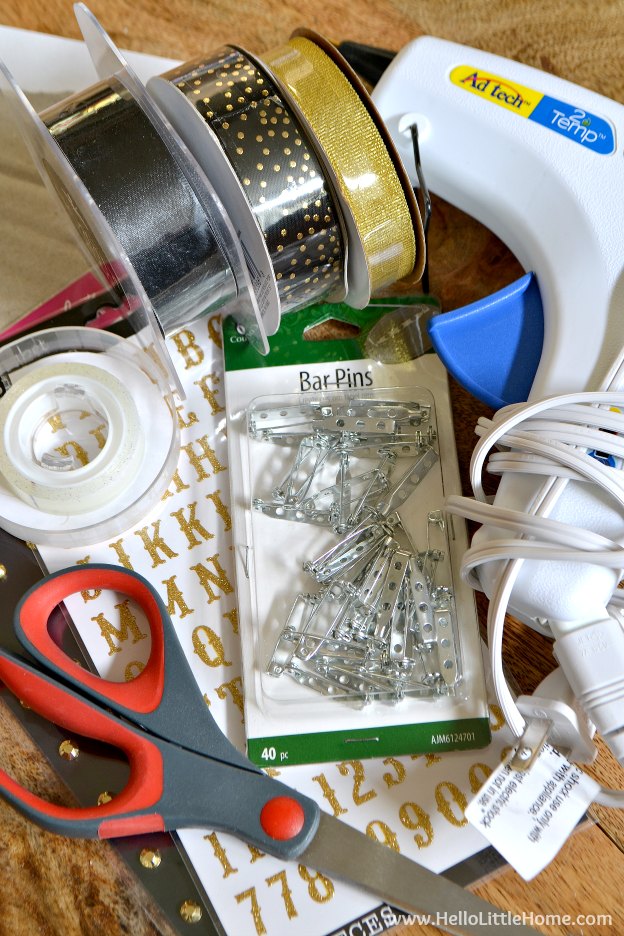
Prize Ribbon Supplies
Want to make your own DIY Award Ribbon? Here's what you'll need:
- cardboard scrap
- card stock (I used white, but choose your favorite color.)
- pencil
- scissors
- double-sided tape
- ribbon (Choose a variety of coordinating ribbons in various widths. I used a gold ⅝-inch ribbon, a black/gold dot ⅞-inch ribbon (similar), and a black 1-inch ribbon.)
- stapler
- hot glue gun
- bar pin
- other decorative elements (letter stickers, rhinestones, glitter, etc.)
How to Make an Award Ribbon
Now that you've gathered your supplies, let's make the ribbon!
Making the Center Cirle
Start by tracing a circle onto the cardboard. I used a ribbon holder that measured about 3 ⅛-inch to create my circle.
You can make this ribbon as big or as small as you'd like though, so don't feel like it needs to be this exact size.

Cut out the cardboard circle, then place it on the white card stock. Draw another larger circle about ½ to ¾ inch larger than your cardboard circle.
You can eyeball this ... it doesn't need to be perfect.
Cut out the card stock circle, center the cardboard circle on it, then attach the two circles together with double-sided tape.
Cut little tabs all around the card stock circle about ½-inch wide. Apply small pieces of double-sided tape to the tabs, then fold them individually around the cardboard circle.
Tip: if the double-sided tape isn't staying in place, add a little hot glue under the tabs for extra security.

Attaching Ribbon to the Center Circle
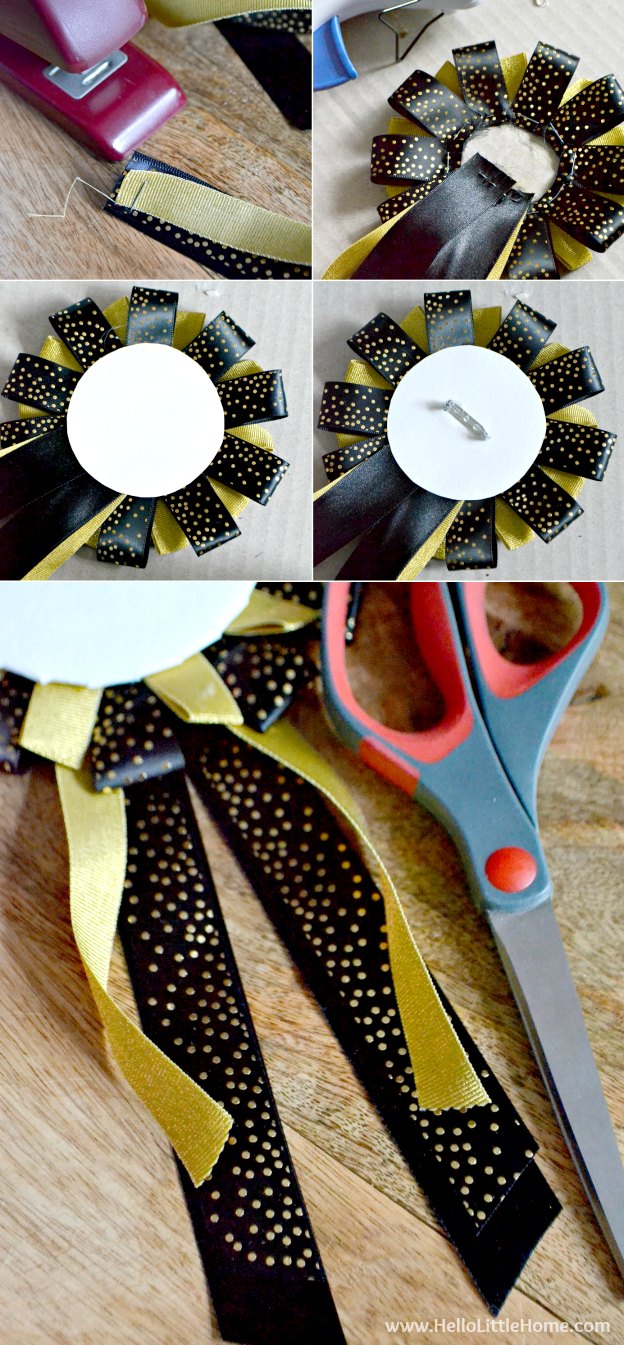
Next, cut out small pieces of the narrowest ribbon about 3-inches long.
Fold the ribbon in half, then staple the edges together. This will make it easier to glue it to the cardboard in the next step.

Apply hot glue near the stapled edge of the folded ribbon, then adhere the ribbon to the back of the cardboard circle. Repeat the process with the remaining ribbon, leaving a little space between the ribbon pieces.
Tip: As you apply the ribbon, make sure the pieces are evenly spaced around the circle. I used ten pieces of ribbon, but depending on the width of your ribbon and the diameter of the cardboard circle you may need to use more or less. Play with the layout to see what looks good.
Repeat this process with the next widest ribbon, cutting the ribbon a little longer so it sticks out further than the first layer.
I cut mine about 3 ½-inches long. When gluing on the second layer of ribbon, make sure that you are attaching it in the spaces between the first layer of ribbon.
Tip: add as many layers of ribbon as you'd like. You could also use a bunch of different ribbon colors to create a fun rainbow effect.

Adding the Ribbon Tails
You'll be attaching the ribbon tails next. Cut six pieces of ribbon (two of each of the three ribbons you are working with) about 8 ½-inches long.
Layer the ribbons so the narrowest ribbon is on top and the widest ribbon is on the bottom. Fan the ribbons out a bit so they don't hang straight down, then staple the three layers together.
Attach the ribbons to the back of the cardboard circle with hot glue (the narrowest ribbon should be facing the front). Glue the ribbons on at a slight angle so they don't hang straight down.
Cut another circle out of the white cardstock, about ¼-inch narrower all around than the original cardboard circle. Apply hot glue to the edge of this circle, then stick it to the back of the cardboard circle to hide the raw ribbon edges.
Hot glue a bar pin the back of the circle you just glued on.
Finally, trim the ends of the hanging ribbon at an angle. Cut the top layer shortest and the bottom layer longest. That way, all three ribbon layers will show.
Decorating the Award Ribbon
The last (and most fun) step is to decorate the front of your DIY Game Night Champion Ribbon.
For mine, I used gold glitter letter stickers to create my message. Then, I applied adhesive-backed rhinestones all the way around the circle.
Get creative here!
You can add any message you want, and this project is a wonderful way to use up any craft supplies you have in your stash (glitter, stickers, stamps, etc.).

It turned out so cute!
I plan to tuck this DIY Game Night Champion Ribbon in the closet with my games, then we can pull it out any time we plan a game night!


Do you play a lot of games with your family?
This is a great idea! My kids are definitely motivated by winning a ribbon at the end of an event, so they would love this. I need to schedule a Game Night In very soon! #client