Looking for Halloween dessert ideas? You'll love these cute Ghost Cake Pops! This delicious treat is surprisingly easy (and fun) to make, plus impossible to resist. The perfect Halloween sweet!

This post contains affiliate links. As an Amazon Associate I earn from qualifying purchases.
Ginnie's Take
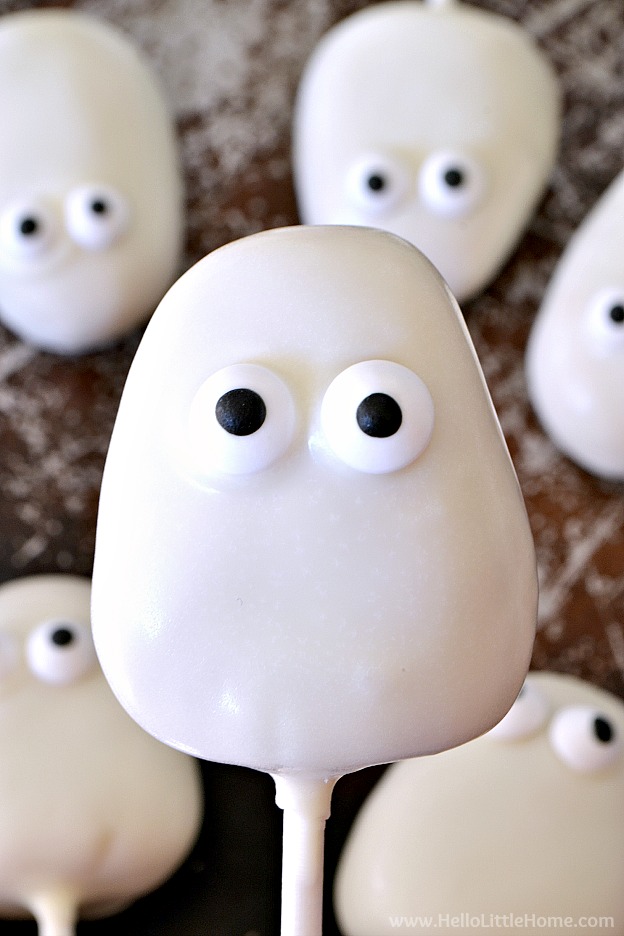
Halloween is just around the corner, and I can't believe that I haven't shared any spooky treats (until now)! I love making cake pops, and I've been wanting to make Halloween cake pops for a while. When I spotted a pack of candy eyes at my grocery store, I decided to make these adorable Ghost Cake Pops. With my niece visiting over the weekend, the timing was perfect. They turned out so cute, and she loved them!
Why You'll Love This Recipe
- Easy to Make - If you've never made cake pops before, you might be surprised at how easy they are too make. All you need is a little time and patience. And you can get your kids involved, too!
- Delicious - This is one Halloween treat that no one will be able to resist! The ghosts are a little goofy, not too spooky, and totally fun. Plus, they taste great!
- Great for Any Halloween Event - These tasty cake balls are the perfect Halloween treat, whether you're keeping things low-key, or throwing a blowout party!
Jump to:
Ingredients
This easy Halloween treat is made with simple ingredients you can find in any store! Here's what you'll need:
- Cake Mix - I typically use a white cake mix to make the pops, but you can use any flavor. Pumpkin cake or spice cake would be perfect for Halloween. Of course, you can bake a cake from scratch, but a mix saves a lot of time. Tip: You'll also need the ingredients to prepare the mix (usually eggs and oil).
- Frosting - You'll also need some frosting, which you'll mix into the cake (after it's cooked). If you're using a flavored cake, use frosting that goes with the flavor. Otherwise, I like to use white frosting, or this homemade Cream Cheese Frosting.
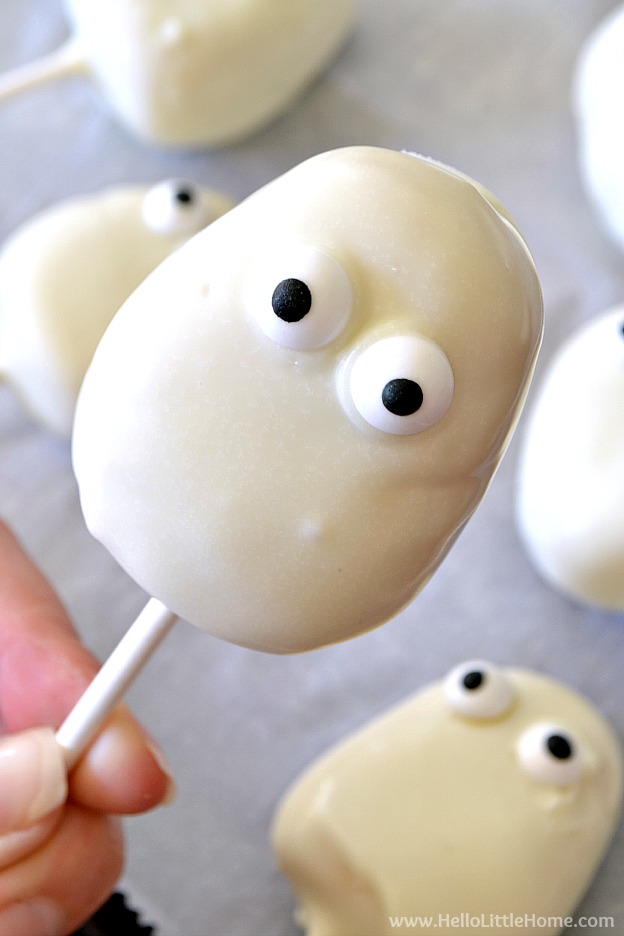
- Cake Melts - To coat the cake pops, you'll use candy melts. I used Ghirardelli White Melting Wafers, but these Wilton Candy Melts also work great.
- Googly Eyes - Grab some candy googly eyes to decorate the pops.
- Sticks - Finally, you'll need some lollipop sticks to hold the pops. The stick are optional, but they make the cake balls easier to eat.
You'll Also Need
Grab a couple cake pans (or a 9 x 13 pan) to bake the cake, a large bowl for the cake mixture, a small bowl for the coating, and a large baking sheet covered in parchment paper. A cake pop stand also come in handy if you want your cake pops to look good from all angles.

How to Make Ghost Cake Pops
These Halloween Cake Pops are surprisingly easy (and fun) to make! You'll find a detailed recipe card below, but here's an overview of the steps:
- Prep the cake. Make the cake mix, following the directions on the box, then let it cool. Once the cake has cooled, use your hands to crumble it. Then mix in just enough frosting to hold the mixture together when it's rolled into a ball. Tip: Use your hands to add the frosting. It's messy, but makes the process easier and faster.
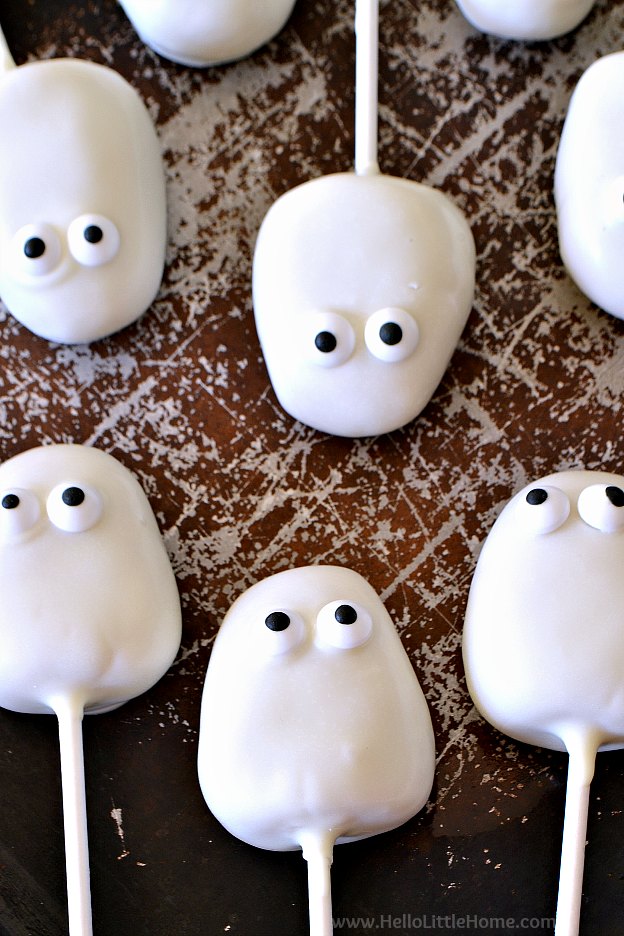
- Shape the pops. Roll a heaping tablespoon of the cake mixture into a ball, and then form it into an oval. Once you've got an oval, flatten the bottom, and reshape the top (the ghost's head) so it's a little narrower. Repeat this process with the remaining cake, then refrigerate the pops for two hours (or freeze them for one hour). Tip: Don't skip this step! Chilling the dough firms up the pops. They'll fall apart if you coat them without chilling first.
- Add the sticks. Once the pops are chilled, melt a few candy melts in a small bowl. Dip the end of a lollipop stick into the candy and insert it into the cake. Once you've added all the sticks, refrigerate the cake pops for about 5 to 10 minutes or until the candy has hardened.
- Coat the pops. Melt the candy melts in a small bowl (you need enough depth to cover the pops). Dip a cake pop into the melted candy to coat. Then, gently tap it on the edge of the bowl to remove the excess candy.
- Add the eyeballs. Let the candy coating set for a minute or two, then press on the candy eyeballs. Place the pop in a cake pop stand, a block of styrofoam, or (if you don't care how to back looks) back on the baking sheet (eye side up). Then refrigerate the cake pops until you're ready to serve them.
Okay, time to enjoy your Ghost Cake Pops! Weren't they fun to make?

Storage
Store leftover cake pops in your refrigerator. Once the coating has hardened, you can transfer them to an airtight container. If you need to layer them, place parchment paper between the pops. They will stay fresh for two to three days.
Related Recipes
If you enjoyed this recipe, check out my other cake pop recipes next:
- These Pumpkin Spice Cake Pops make a scrumptious fall treat!
- Celebrate someone special with these Birthday Cake Pops with Sprinkles.
- Make these adorable Heart Cake Pops for Valentine's Day!
- For more tips, don't miss my easy Cake Pop Tutorial.
Looking for more Halloween ideas? You'll love these Mummy Hot Dogs, Dirt Cheesecake Parfaits, Roasted Pumpkin Seeds, and Mini Pumpkin Tarts, too!

Ghost Cake Pops
Ingredients
- 1 white cake mix (plus the ingredients to make it)
- ¼ to ½ cup frosting
- 2 packages white candy melts
- lollipop sticks
- candy eyeballs
Equipment
- Lollipop Sticks
- Cake Pop Stand (or large piece of styrofoam)
Instructions
- Bake the cake mix according to the package directions, then let cool completely.
- Place the cake in a large bowl, then crumble with your hands.
- Mix in just enough frosting (using your hands), so the cake holds together when you roll it into a ball.
- Take a heaping tablespoon of cake and form it into a ball. Gently roll the ball into an oval, then shape it so the top (the head) is narrower than the bottom, and the bottom is flat.
- Smooth any cracks, then place the cake ball, bottom side down, on a lined baking sheet. Repeat the process with the remaining cake.
- Refrigerate the cake balls for 2 hours or freeze for 1 hour. (Do not skip this step or your cake pops will fall apart when you try to coat them.)
- Melt a few of the candy melts in a small bowl.
- Dip a lollipop stick into the melted candy, then press it into the bottom of a cake ball. Wipe away excess candy, then return cake pop to the baking sheet. Repeat process with remaining cake balls, then refrigerate until candy is hard (about 5 to 10 minutes).
- Melt about one and a half bags of the candy melts in a small bowl, following package directions. Dip cake pops in melted candy to coat.
- Gently tap cake pop on edge of bowl to remove excess candy, then place in cake pop stand (or styrofoam block), or return cake pop to lined tray.
- After candy coating sets for a minute or two, press eyes onto cake pop. Repeat process with remaining cake pops.
- Refrigerate cake pops until ready to serve. Enjoy!
Notes


These are the cutest spooks ever!
Thank you so much, Lisa!
These are super cute, Ginnie!
Thanks, LeAndra! They're so fun to make,too 🙂