Learn how to make a Christmas Shadow Box with this fun and festive tutorial!
This post contains affiliate links. As an Amazon Associate I earn from qualifying purchases.
Christmas Shadow Box
I am way behind on my Christmas decorating. Usually, I have everything up right after Thanksgiving ... not this year.
As I was going through my box of holiday decorations the other day, I came across the DIY Vintage Christmas Ornaments that I made a couple years ago. I had filled empty tin containers with clip art, glitter, and various ephemera to create the vintage-inspired shadow box ornaments.
Those ornaments were so much fun to make, and I was feeling crafty. So I challenged myself to create another one using only the supplies I had around my apartment.
After searching my home for materials, I realized that I didn't have any containers small enough for ornaments, so I decided to make a larger shadow box instead.
It was so fun to make that I could't wait to show you how to make a Christmas shadow box, to!

How to Make a Christmas Shadow Box
Want to make your own vintage-inspired shadow box? Here's what you'll need:
Supplies:
- cigar box or other container (This box is similar in size to the one I used. Michaels is a great source for wood boxes, too.)
- vintage clip art (The Graphics Fairy is a great resource.)
- decorative papers
- various ephemera (ribbons, cotton balls, glitter, tinsel, faux snow or greenery, etc.)
- paint or nail polish
- hot glue gun
- scissors
Start by painting the box so it has time to dry. You can use craft paint, acrylic paint, or even nail polish.
Paint the whole thing, the inside, or the outside. It's up to you.
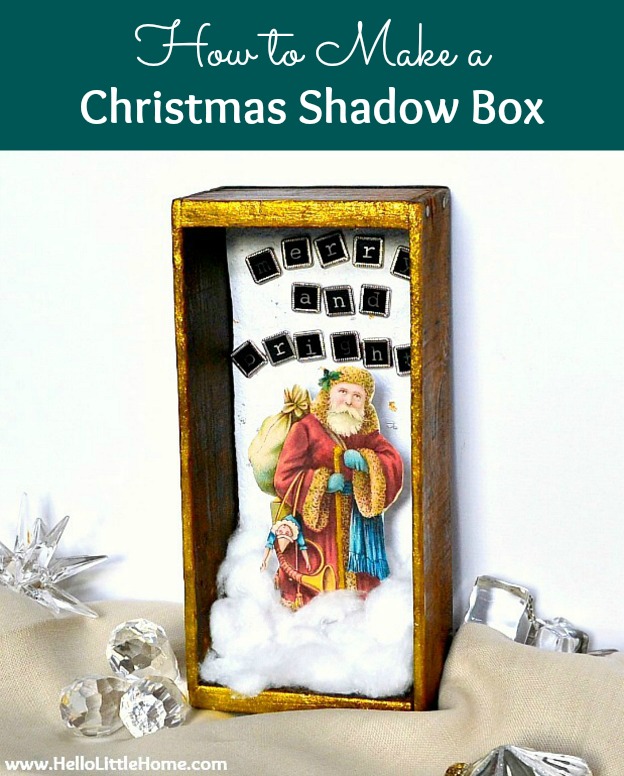
I didn't want to hide my box's vintage character, so I chose to simply paint the outside edge with glittery gold nail polish (This polish is a similar color to the one I used, but my fave gold craft paint would work, too).

Next, cut out the clip art. Take your time going around the corners and edges. It's easy to accidentally amputate paper limbs!
I used a Victorian Santa image from The Graphics Fairy.
If you don't want to use a Santa, check out their roundup of 100 free Christmas images.
After you've cut out your clip art, play around with your materials to determine a layout.

Once you've decided on the box's layout, it's time to begin decorating your box. You'll want to start with the back layer first.
The letters I used to spell "Merry and Bright" were actually decorative brads, so I attached those to my backing paper first, and then hot glued the paper to the box. I added a little extra glue behind the letters to ensure everything would stay in place.
This is a first-gen glue gun! I can't even tell you how many fingers have been burned on this thing over the years ... thankfully, I have since replaced it!

Next, I added a layer of cotton balls for my snow.
Cover up any blank spaces and vary the placement height of the balls (to avoid a layout that is too uniform looking). Attach the cotton balls with your glue gun.
Tip: for a more realistic look, pull the cotton balls apart a bit before gluing them down.
My Santa was next. I wanted him to stand out from the background, so I attached him with foam mounting squares (stacking a few on top of each other for height).

Before I finished, I wanted to give my box more depth.
So I added additional cotton balls, surrounding my Santa with snow!

At this point, continue adding various ephemera until you are happy with the design.
I kept my shadow box fairly simple, but I'm going to keep an eye out for a little holly sprig for Santa's hat.
Wouldn't that look cute?

I hope you enjoyed learning how to make a Christmas shadow box!
This easy Christmas craft can be totally customized depending on the supplies you use ... so get creative!
You could even personalized this homemade shadow box with vintage family photos. Wouldn't that be cute?

Here are the ornaments I made a few years ago.
As you can see, there really is no limit to what you can do with this project!
Get the tutorial for these DIY Vintage Christmas Ornaments here.


Are all of your Christmas decorations up, or am I the only one so far behind?
P.S. Make sure to check out all of my Christmas crafts, recipes, and decor ideas here!
Stopping by from Show Stopper Saturday. These are super adorable! And all the possibilities, such a creative idea. Thanks for sharing. 🙂
Hi, Meg! Thank you so much. It's such a fun project - I hope you'll try it!
You are SO talented! I love all things vintage Christmas and this is just perfect!
You are so sweet, Alison! Thank you so much. I love vintage Christmas things, too:)
Thanks so much for linking up at The Wednesday Roundup! This is just beautiful!! Angela
Thank you so much, Angela! I had a lot of fun putting it together:)
That is very cute. I love the round ones. I am looking forward to seeing how you work a tree into your little space. Do you get a real tree? We only have our tree and outside lights up. I still want to do the porch and mantle.
Thanks, Anne! We've had a real tree the past couple years, and I got rid of my fake tree before we moved here (no room to store it). I'm still trying to decide where/if a tree will fit in our apartment. Hopefully, we'll get one this weekend.