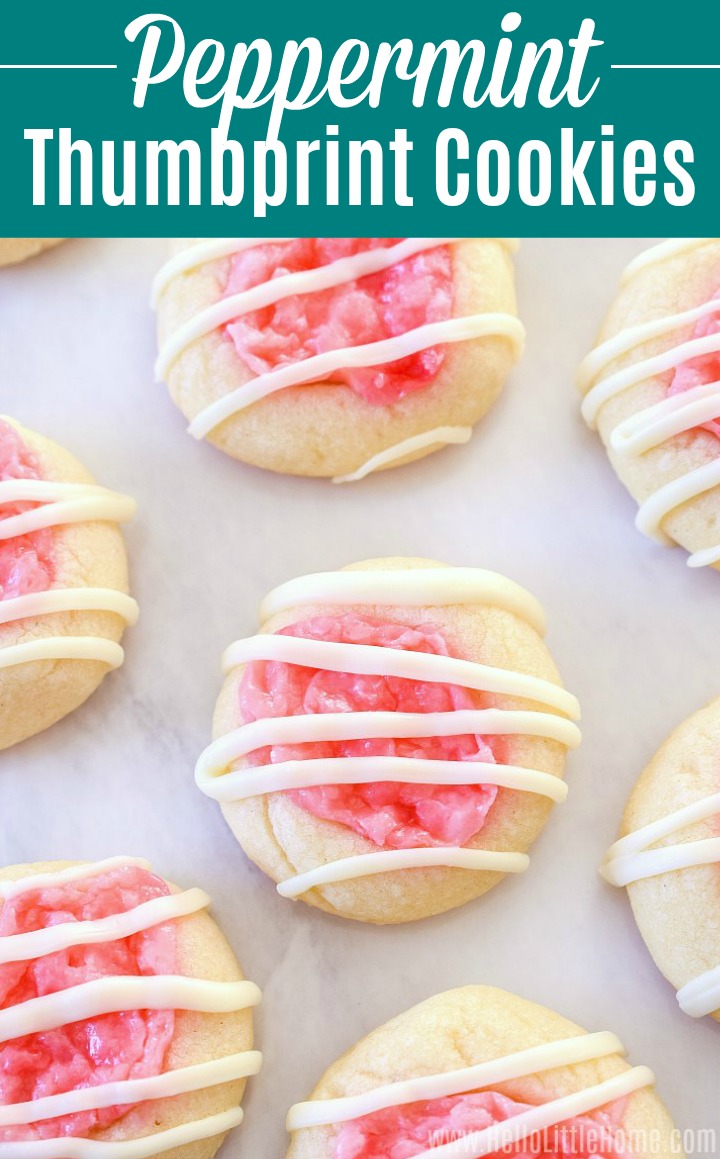
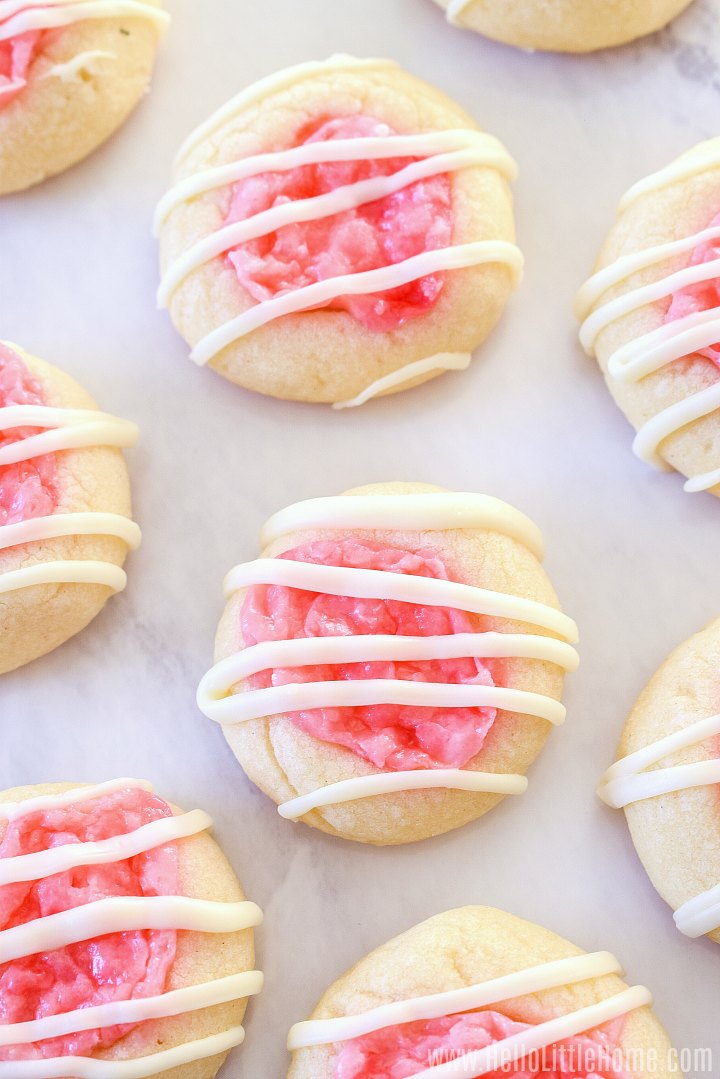
Treat yourself to these scrumptious Peppermint Thumbprint Cookies! With their festive Candy Cane filling and cute White Chocolate drizzle, they're sure to impress. And you won't be able to resist their festive and delicious flavor either!
This post contains affiliate links. As an Amazon Associate I earn from qualifying purchases.
It's cookie season, and I'm here for it! I look forward to eating my fave Christmas cookies all year long. Some cookies are cherished family recipes and others are new additions, but they've each earned a place in my heart.
These Peppermint Thumbprint Cookies are a new favorite! I was inspired to create these holiday cookies by a recipe I found in my mom's cookbook, where she collected all of our favorite family recipes, along with other recipes that she wanted to try.
I don't remember her ever making these unique cookies. But after tweaking the ingredients a bit, I'm so happy with how these Peppermint Cookies turned out ... they're cute, festive , and of course, super delicious! Pretty much the perfect holiday cookie.
You are going to love the wonderful peppermint flavor in these petite cookies. They're easier to make than you'd think. And it's impossible to stop at just one, so I don't recommend you even try! Give them a try this holiday season... I think they'll become a favorite for your family, too.
Ready to start baking? Keep reading for the recipe and lots of easy tips!
🎄🎄🎄 P.S. This holiday season, I'm joining my food bloggers friends to raise money for Cookies for Kid's Cancer (a truly amazing nonprofit) and to share our favorite cookie recipes! You can find out more about this wonderful organization (plus, pick up some delish recipes!) below.

Ingredients
This recipe has a few components, but the ingredients are easy to find! Here's what you'll need:
- Dough: You'll make the tender dough with unsalted butter, powdered sugar, egg yolks, peppermint extract, flour, and salt (I recommend using koser salt.)
- Filling - The delicious filling is made with rushed candy canes (or other peppermint candy), cream cheese, powdered sugar, and milk.
- Topping: To make the topping, you'll combine white chocolate chips and peppermint extract.
Because the ingredients are so simple, make sure to the best quality products. It can sometimes be hard to find peppermint extract at this time of year, so buy it as soon as you spot it or purchase it online. And make sure to use pure peppermint extract, not imitation extract or peppermint flavor products.
Choose a good quality chocolate chip, too. Most grocery stores carry Ghirardelli chips, which are my fave. Feel free to substitute a chocolate bar instead of chips, if you prefer.
You'll also Need
To make these cookies, you'll want to gather a couple baking sheets, a stand mixer (or hand mixer), measuring spoons and cups, and a piping bag or decorating bulb (my fave kitchen gadget!) with a small round tip for adding the chocolate drizzle. (A zip top bag with the corner snipped off also works in a pinch.) Parchment Paper also comes in super handy when decorating the cookies.

How to Make Peppermint Thumbprint Cookies
These cute little bites of peppermint perfection are easier to make than you'd think! You'll find a detailed recipe card below, but here's an overview of the steps:
- Make the filling. Start by mixing together the cream cheese, powdered sugar, and milk. Once that's combined, stir in the crushed peppermint candy. Tip: I used candy canes, but any other peppermint candy would work, too.
- Prepare the dough. To make the dough, begin by creaming together the butter and powdered sugar. Then add three egg yolks (save the whites for another use) and the peppermint extract. Next, add the flour and salt. Tip: When adding the flour, start your mixer on low, then gradually increase the spread, continuing to mix just until the dough comes together.
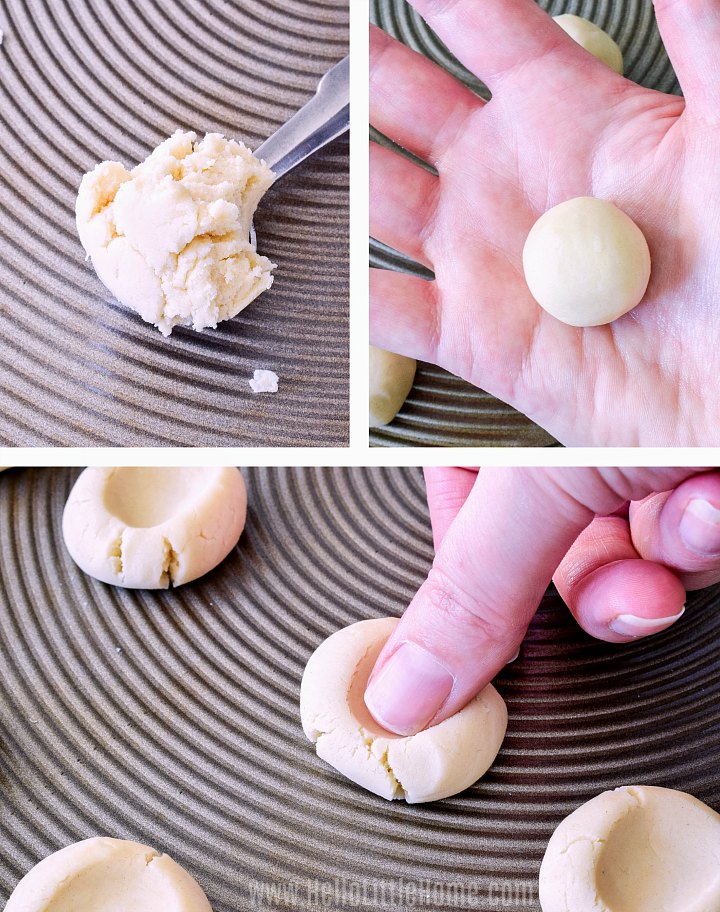
- Shape cookies. To form the cookies, scoop out a generous teaspoon of dough. Roll it into a ball, then place the ball on an ungreased baking sheet. Press your thumb into the dough to make an indentation. Tip: this process moves faster if you do it assembly line style. Start by scooping out all the dough, then roll the dough into balls, and finally, make the thumbprints.
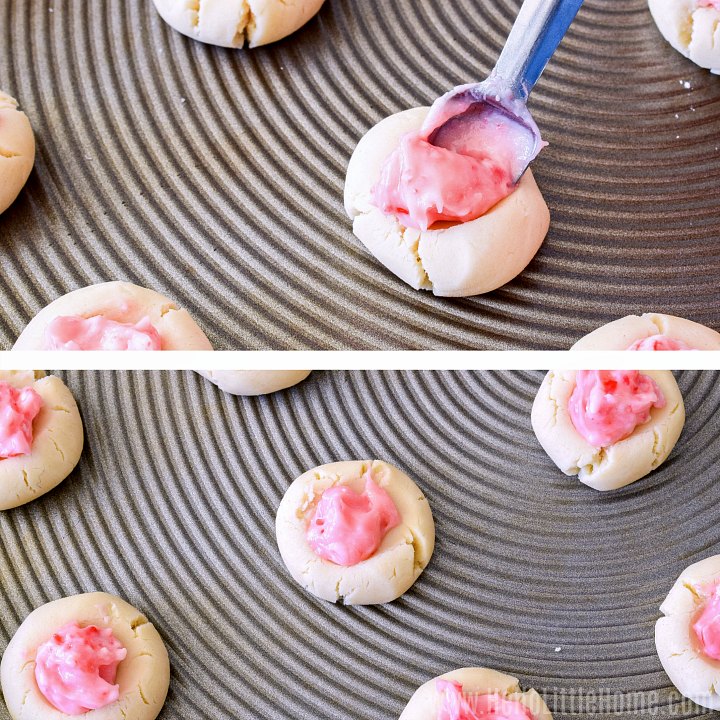
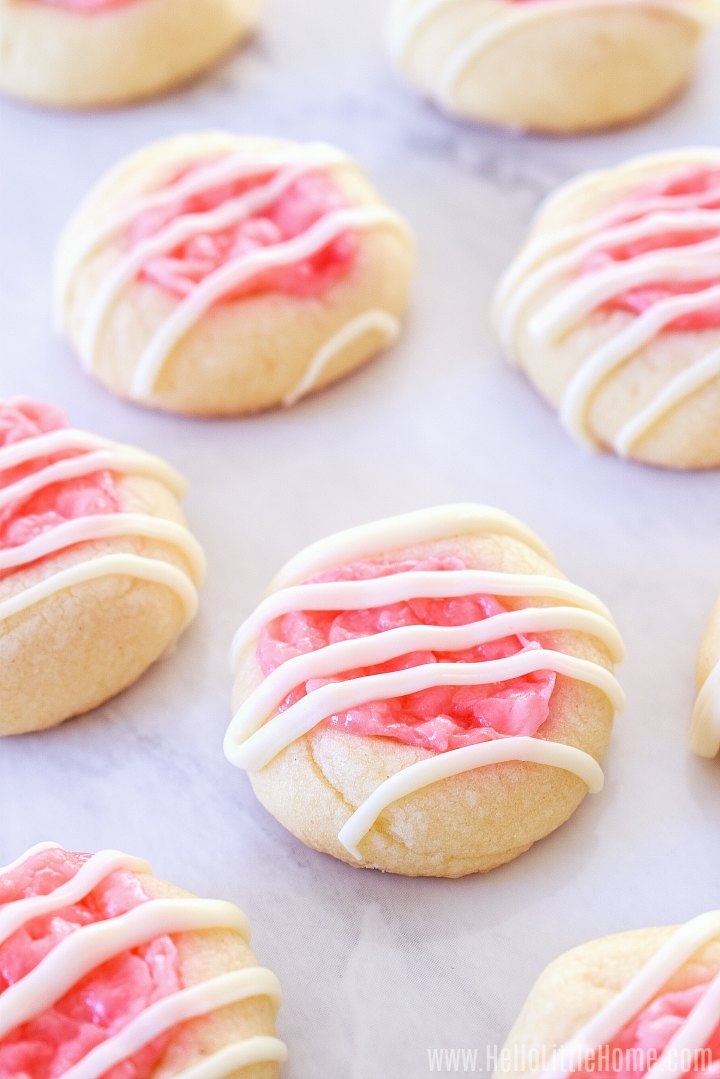
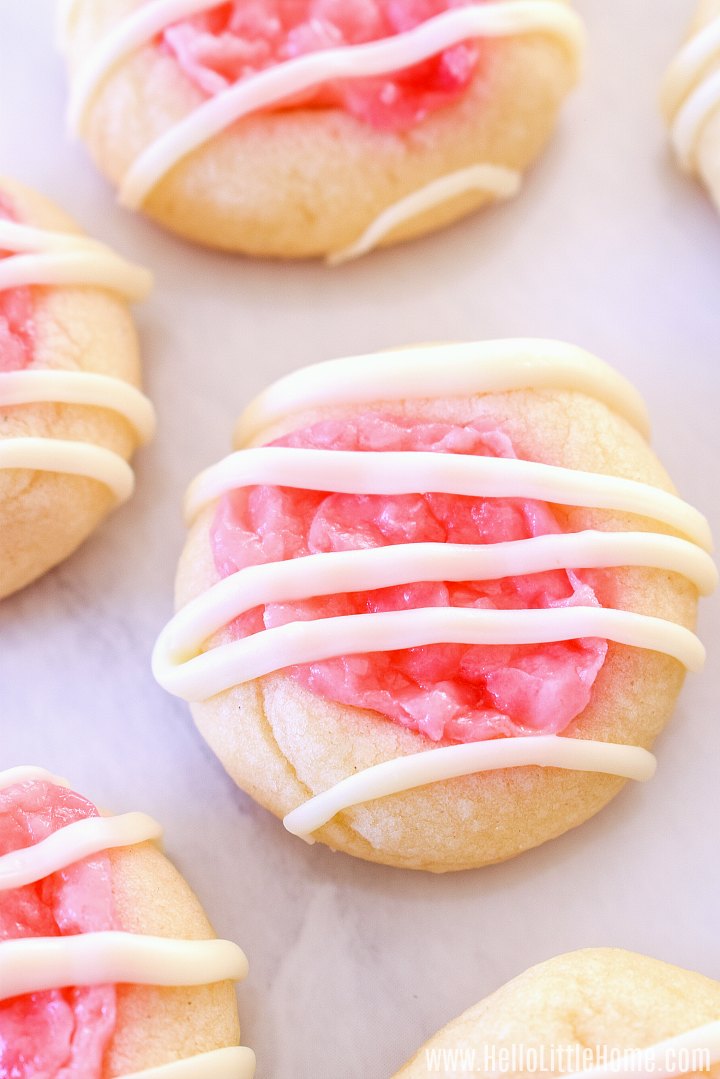
- Fill the cookies. Once you've added the thumbprints, add about a ¼ teaspoon of filling to each indentation. Tip: The filling is sticky, so portion it out using a ¼ teaspoon measuring spoon, then use another small spoon or spatula to scrape the filling out of the measuring spoon into the cookie.
- Bake. Once the cookies are filled, bake them for about 10 to 12 minutes. You'll know they're ready when the filling starts to bubble up a bit. The tops of the cookies shouldn't be change color, but the bottoms should be lightly browned. Let the cookies cool for a few minutes, then transfer them to a wire rack to cool completely.
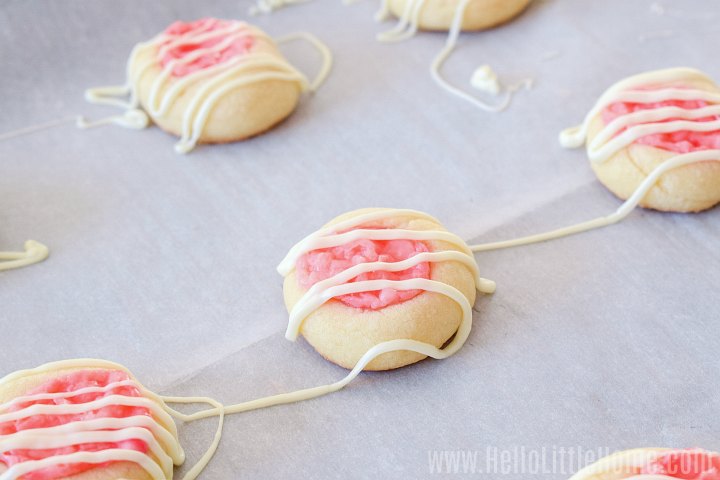
- Make the drizzle. Place the white chocolate chips in a small bowl, then microwave at 10 second intervals (stirring very well in between) until the chips are melted (about 30 seconds total). Stir in the peppermint extract, then transfer the chocolate to a piping bag with a small tip, a decorating bulb (my fave!), or a zip top bag with the corner snipped off. Tip: Avoid overheating the white chocolate or it will seize up, and you'll have to start over with new chocolate!
- Decorate the cookies. Drizzle the chocolate back and forth over the cookies. Don't strive for perfection here ... move quickly for the best results. Let the chocolate set, and then your Peppermint Thumbprints are ready to eat! Tip: if you place the cookies on a piece of parchment paper before drizzling them, then you can just throw out the paper when you're done (no cleanup).
And that's all there is to it ... time to enjoy your gorgeous (and delicious) Peppermint Thumbprint Cookies!
Storage
Your cookies should keep for about a week if stored in an airtight container. I use a round pie keeper to store cookies, and it works perfectly. The cookies may also be frozen for up to three months (again, I use that pie keeper). Defrost the cookies at room temp before serving, or enjoy them right from the freezer if you just can't wait!
Related Recipes
If you enjoyed this recipe, then you'll love my other Christmas cookies and treats, too!
- White Chocolate Peppermint Bark
- Dark Chocolate Peppermint Park
- Chocolate Peppermint Crinkle Cookies
- Honey Cookies
- Black Bottoms (Mini Chocolate Chip Cheesecake Cupcakes)
- Poppy Seed Kiss Cookies
- Pecan Finger Cookies ... my all time fave!
- Curry Shortbread Cookies
- White Chocolate Cranberry Cookies
- Chewy Ginger Spice Cookies
- Salted Caramel Pretzel Cookies
- Stamped Cookies
- Classic Gingerbread Cookies
- Sour Cream Cut Out Cookies
- Maple Pecan Shortbread Cookies

Looking for even more cookie recipes? Then you're in luck, because I'm joining Erin from The Speckled Palate and Susannah from Feast + West for the Sweetest Season Cookie Exchange! If you're looking for creative cookie recipes, then you'll love this awesome virtual cookbook with hundreds of delicious cookie recipes from my fellow food bloggers.
Help support a great cause! I'm especially excited about this year's exchange, because we're raising money for Cookies for Kids’ Cancer, 501(c)3 non-profit organization dedicated to funding research for new, innovative, and less-toxic treatments for childhood cancer. Since 2008, Cookies for Kids' Cancer has granted $23 million to pediatric cancer research in the form of 140+ research grants to leading pediatric cancer centers across the country. From these grants have stemmed 60 treatments available to kids battling cancer today.
Please join me supporting this wonderful organization by making a donation. This year OXO is matching all donations through the end of 2025 for up to $100,000. So anything you donate will be doubled!!

Peppermint Thumbprint Cookies
Ingredients
For Filling:
- ½ cup powdered sugar
- 2 tablespoons cream cheese, at room temperature
- 2 teaspoons milk
- ½ cup crushed peppermint candy
For Dough:
- 1 ½ cups unsalted butter, at room temperature
- ¾ cup powdered sugar
- 3 large egg yolks
- 1 ½ teaspoons peppermint extract
- 3 ¾ cups flour
- 1 ½ teaspoons kosher salt
For Topping:
- 1 cup white chocolate chips
- ½ teaspoon peppermint extract
Equipment
Instructions
- Preheat oven to 350 degrees.
Prepare Filling:
- Mix powdered sugar, cream cheese, and milk until smooth. Stir in peppermint candy, then set aside.
Prepare Dough:
- Cream together butter and powdered sugar until well mixed using a stand mixer. Mix in egg yolks and extract.
- Add flour and salt to butter mixture. Mix on low speed until flour is mostly incorporated, then turn up speed for a few seconds until dough comes together.
- Scoop out generous teaspoon of dough. Roll dough into a ball and place on an ungreased baking sheet. Press thumb into dough to make indentation.
- Repeat process with remaining dough, placing cookies 1-inch apart on baking sheet.
- Fill indentation with ¼ teaspoon candy cane filling.
- Bake cookies for about 10 to 12 minutes, or until filling puffs up slightly and cookie bottoms are light brown.
- Cool cookies for a couple minutes on baking sheet, then transfer to a wire rack to cool completely.
Add Topping:
- Microwave chocolate chips in a small bowl at 10 second intervals, stirring very well between each interval, until melted.
- Stir in peppermint extract, then transfer chocolate to a piping bag with a small round tip. Drizzle chocolate over cookies.
- Let chocolate harden before serving cookies. Enjoy!
Notes
Nutrition
