This fun, cute Tote Bag Makeover is the perfect way to upcycle a promotional tote! Adults and kids will love trying their hand at this easy, no-sew tote bag craft!

This post contains affiliate links.
If you are anything like me, you have a large collection of promotional tote bags. These bags are given out everywhere and add up fast. I must have at least 10 in my closet ... actually, I'm a pack rat, so that's probably a low estimate!
Although these bags are perfect for shopping and carrying groceries, I must admit that I don't like carrying bags with huge logos. They're just not cute!
I decided to give one of these carryalls a tote bag makeover, and I couldn't be happier with the result!
Do you have a lots of these bags, too? Want to decorate a tote bag with ribbon or fabric? Wondering how to cover a logo on a bag?
Then, this cute DIY tote bag idea is the perfect way to upcycle your old bags.

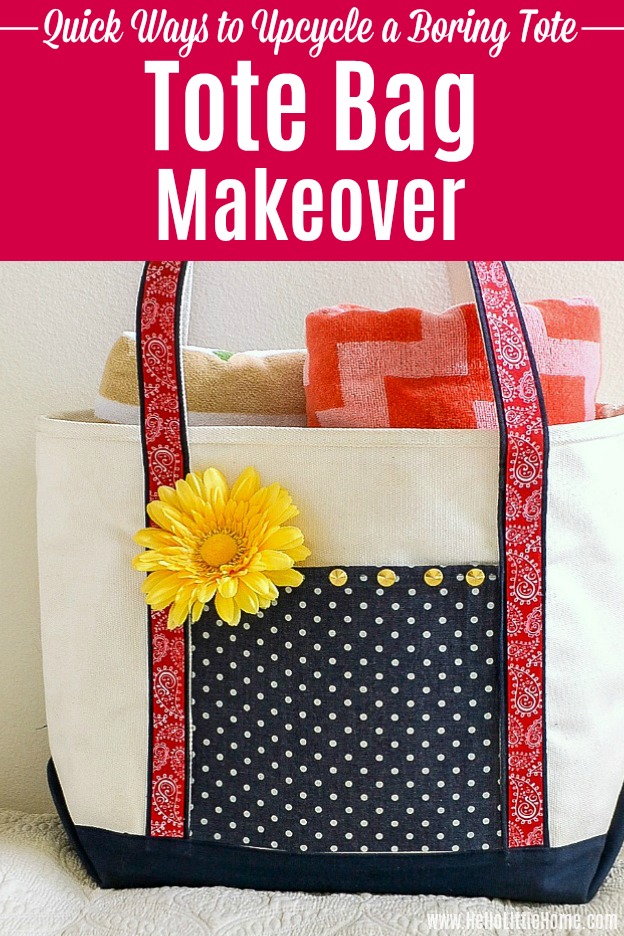
Tote Bag Makeover
I've attended a lot of events lately, and there's always a swag bag at the end. I'm not one to say no to free stuff and some of the bags have been really nice. There's always that ever present logo though.
A sturdy canvas tote is the perfect beach bag, so I started thinking about how I could give mine a makeover. A little fabric and ribbon was all I needed to tackle this fun tote bag craft.
You probably have tons of these totes, too, and decorating canvas tote bags is the perfect way to make them more your style. I love that this project is so simple and can be customized to your taste.
The best part of this makeover? There's no sewing involved! I used Stitch Witchery, a fusible bonding web. It holds seams together with no stitching required, just a hot iron.
This fun tote bag craft idea has so many possibilities!
I had some scraps of polka dot fabric in my stash, so I used that to cover the promotional text. Then I covered the handles with some pretty ribbon. Easy-to-apply iron on studs were the finishing touch.
My tote bag turned out so cute, and I love how this project can be customized with different fabrics and ribbon.

Tote Bag Craft ... Step-by-Step Tutorial
Want to create your own tote bag makeover? Here's what you'll need for this simple tote bag craft:
- canvas tote bag (Need a tote? Here's an affordable tote that comes in lots of colors.)
- decorative fabric
- scissors
- iron
- Stitch Witchery (no sew fusible bonding web)
- ribbon
- iron on studs
Covering the Pocket
Start by measuring the pocket on your tote bag, if it has one. Cut the decorative fabric to the same dimensions, plus an extra ½-inch on all sides.
Fold each side over by ½-inch and then iron the seam flat.
Tip: if your bag does not have a pocket, you can add one to cover up the promotional printing. Measure the area where you want the pocket, then cut out your decorative fabric to the same dimensions, plus 1-inch extra on all sides. Fold the edge over ½-inch, then iron flat. Fold the edge over another ½-inch and iron flat. The raw edges of your fabric should be enclosed in the seam.

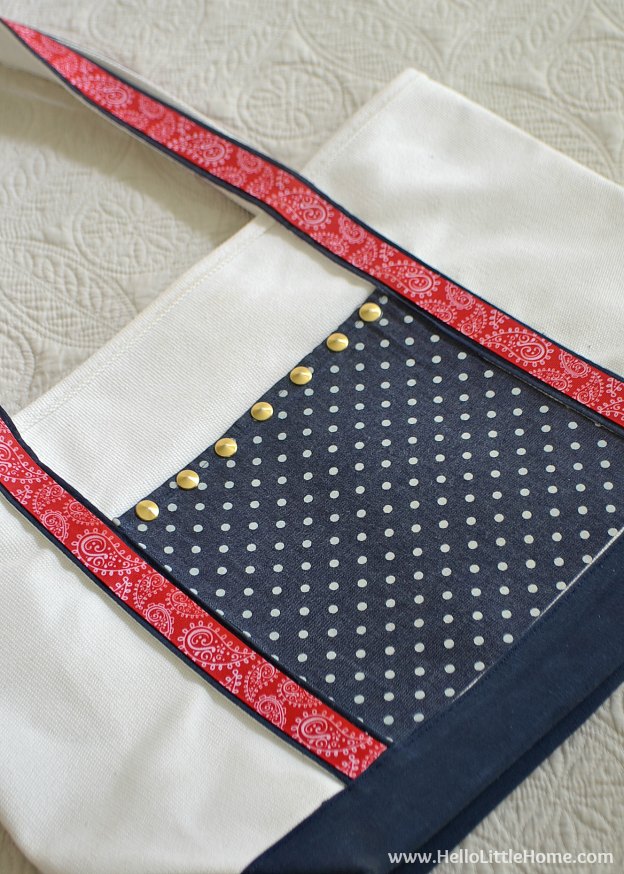
Cut a piece of Stitch Witchery to equal the length of one side. Place it under the seam, as shown below, then fold over so it's hidden in the seam.
Go over the fabric with a hot iron to fuse the seam together. Repeat the process on the remaining seams.

Your piece of fabric should look similar to mine below when you are finished.
My fabric came from an old shirt, and one of my edges was already finished (the narrow seam on the upper left). Lucky me, I only needed to finish three sides of my fabric piece!

Next, you are going to attach the fabric to the pocket.
Cut a piece of Stitch Witchery to fit the width of your pocket. Place your fabric over the Stitch Witchery, wrong side facing the tote.
Iron the fabric onto the tote. Once the fabric is fused to the tote, continue adding strips of Stitch Witchery and ironing until the fabric is completely attached to the pocket. You can add more than one strip at a time.
Tip: if your bag does not have a pocket, just apply the Stitch Witchery around the left, right, and bottom edges of the fabric. Iron it on to create the pocket. Better yet, stitch around the pocket with needle and thread or with a sewing machine to ensure it stays attached.

Adding Ribbon to the Tote Bag Straps
You'll attach the ribbon to the straps next. Start by lining up the Stitch Witchery with the bottom of one strap. Lay the ribbon over the Stitch Witchery, then iron the ribbon in place. Repeat to cover the rest of the strap.
Tip: I recommend working on a small portion of the strap, instead of trying to attach all the ribbon at once. Lay out the Stitch Witchery, cover it with ribbon, iron it in place, then more onto the next section. It's easier to keep everything lined up that way.

Attaching the Iron-on Studs
Finally, you are going to add the decorative studs.
Simply place them on the edge of the pocket wherever you'd like them, then place the iron over the top of one stud. Hold the iron in place about 30 seconds or until the stud is attached to the fabric. Repeat with the remaining studs.

Once your studs are attached, you are done.
This tote bag makeover is super flexible, so feel free to add your own touch.
You could create a monogram with iron on letters or add some decorative patches. The only limit for this cute canvas tote bag is your imagination!

I couldn't resist tucking a pretty yellow flower into my tote while I was taking photos.
Doesn't it look summery?

I think the studs are my favorite part of this tote bag makeover.
It was my first time working with iron on studs, and I was a little perplexed at first.
They were super easy to use though, and I love how they add a little edge to this red, white, and blue bag.

I also love the mixed prints!
If you've never combined multiple prints before, try to select a small print and a large print, like I did with the dots and paisley. Complementary colors also help make the two prints work together.
Let me know if you try this project ... I'd love to see how it turns out!
Are these bags piling up around your home, too? Do you use them?
Great update! Found you at the Tatertots & Jello link-up. I posted a tote bag makeover as well! I've been doing a series this year called "Tote Bag Upgrade" with a new tutorial every month. I really like how you used a tote bag you already had and covered the logo. I'm hoping people can adapt my tutorials to use materials they already have like you did here. The ribbons and flower are a great touch!