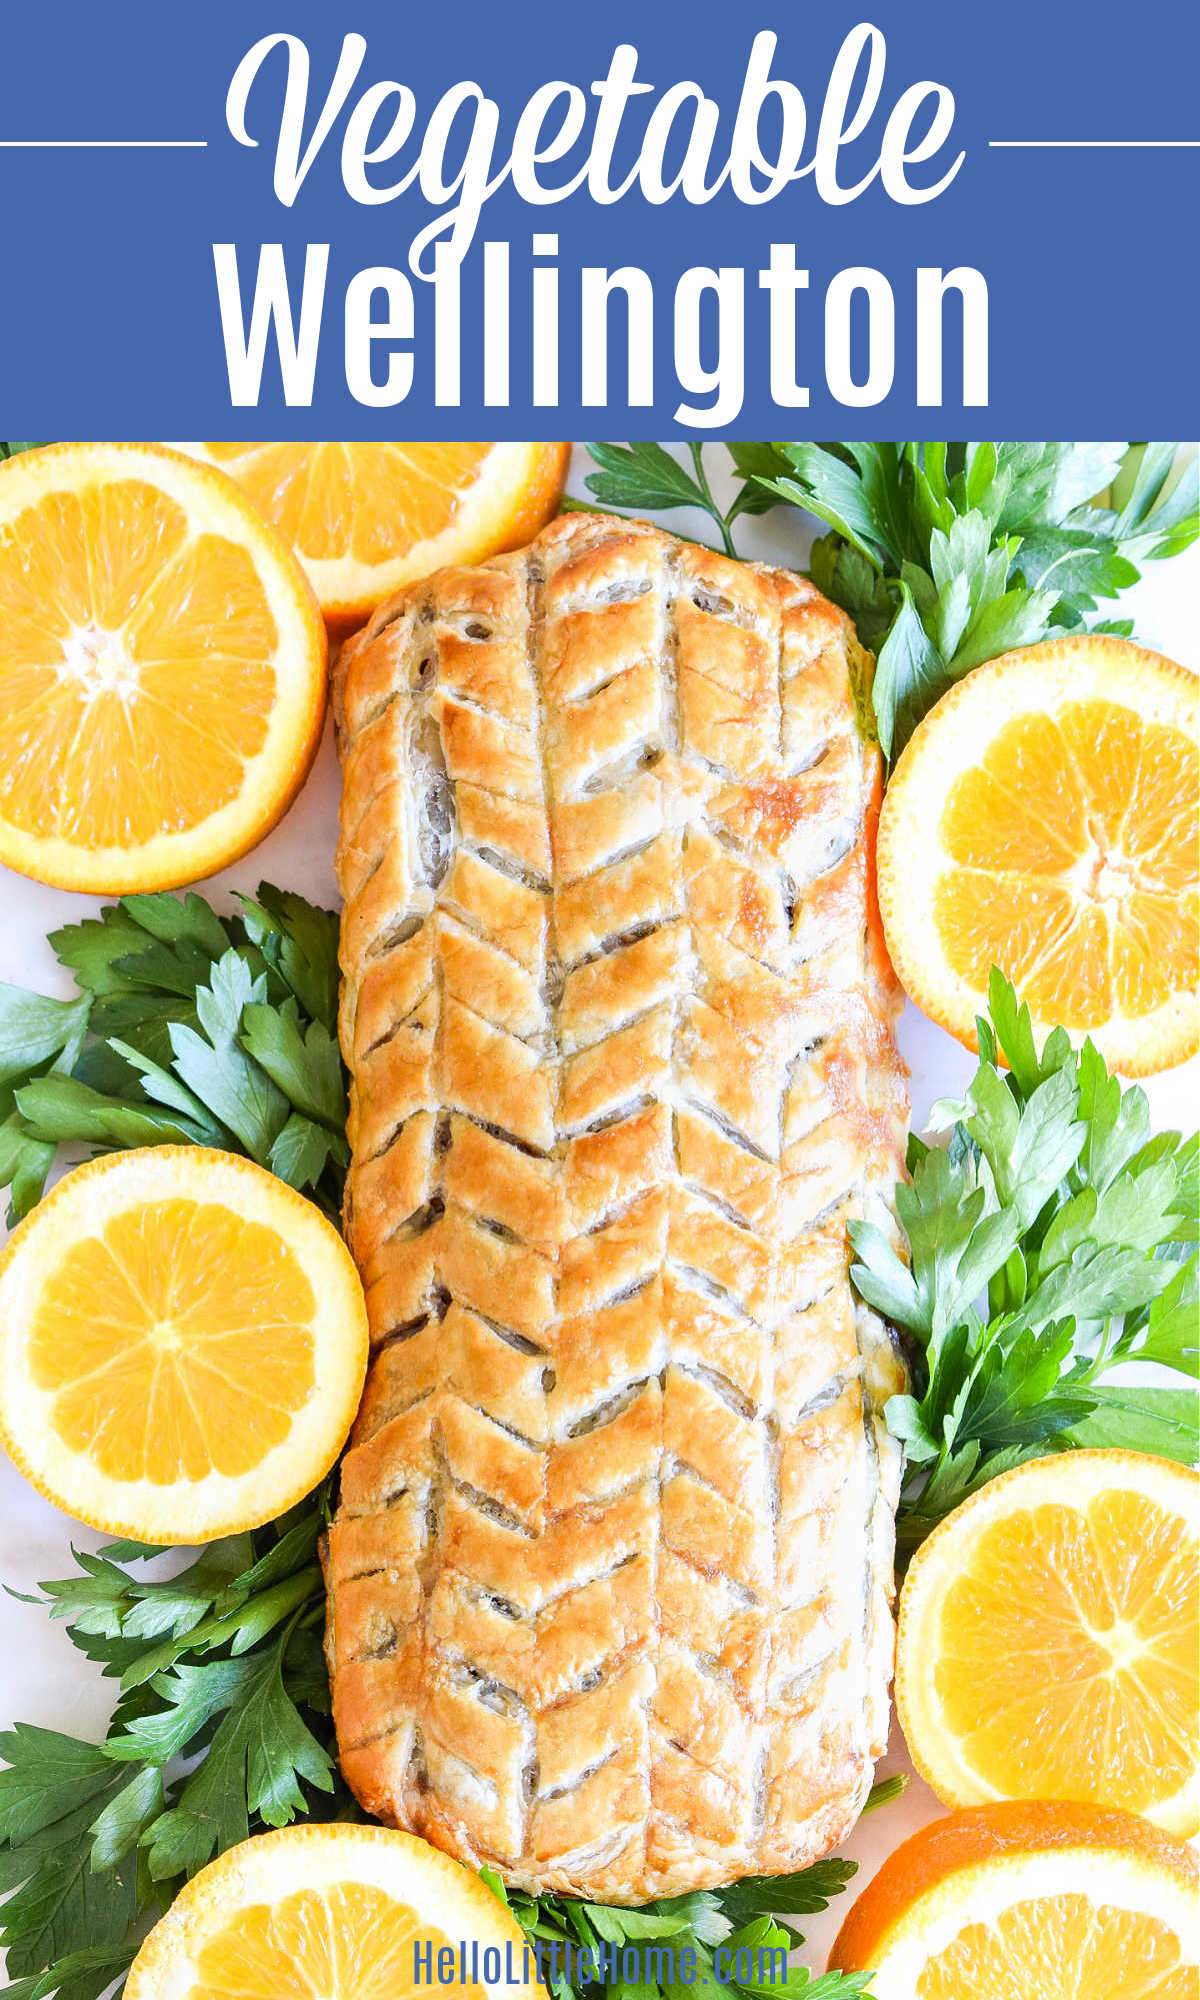
Looking for a beautiful holiday main dish that's vegetarian (and vegan) friendly? Then you're going to LOVE this Vegetable Wellington! This gourmet entrée is loaded with fresh veggies and fragrant herbs and full of warm, festive flavors. Best of all, it's a total crowd pleaser, and it's easy to make!

This post contains affiliate links. As an Amazon Associate I earn from qualifying purchases.
It's officially holiday season, and when it comes to entertaining at this time of year, I love pulling out all the stops!
There's nothing better than serving your guests an impressive entrée that will have them oohing and aahing ... and this gorgeous Vegetable Wellington is a total show stopper!
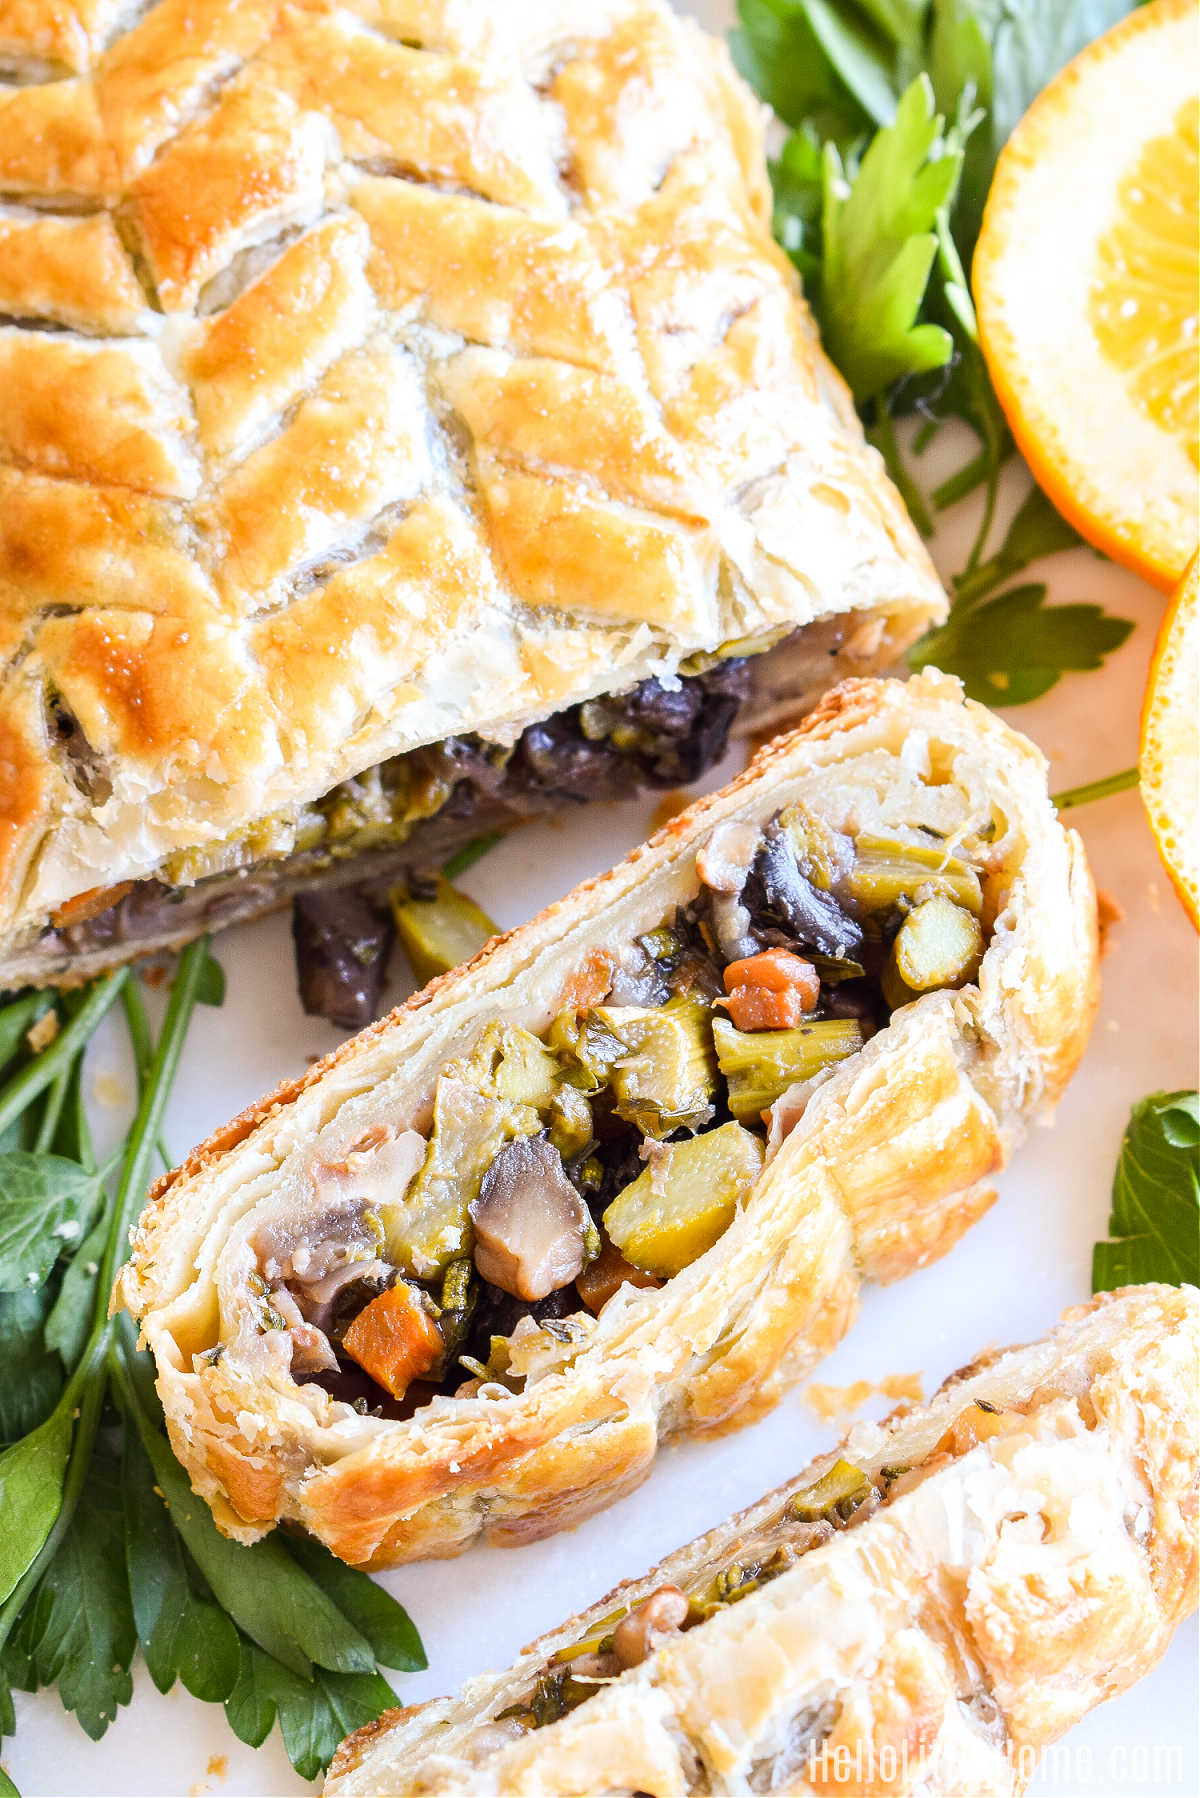
This mouthwatering recipe features a delicious medley of sautéed veggies and herbs, all wrapped in golden puff pastry. It's as beautiful as it is delicious!
But can I let you in on a little secret? This Veggie Wellington may look super fancy, but it's surprisingly easy to make, and I'm going to walk you through the whole process step-by-step.
No one has to know that but you though! So if you're ready to start raking in the compliments, keep reading for all the details.

About the Recipe
This recipe is a modern, vegetarian-friendly version of Beef Wellington, a classic British dish that made from beef tenderloin, surrounded by pâté and mushrooms duxelles (minced sautéed mushrooms), then wrapped in puffy pastry and baked.
Obviously, there's no meat or pâté in this Veggie Beef Wellington. And with all its vegetables and herbs, this recipe is a lot lighter and fresher tasting, too. It's a total show stopper too, and the best main dish for impressing your guests on a special occasion, like Christmas!
Ingredients
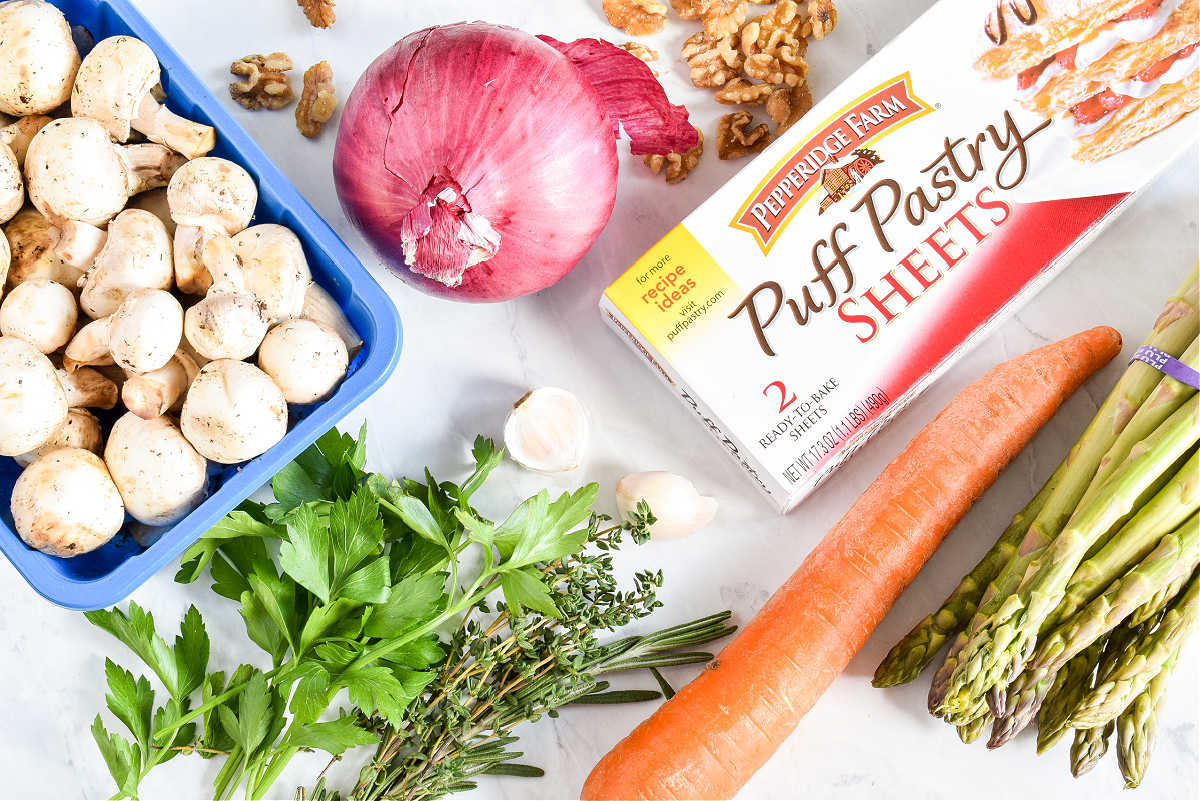
This recipe feels fancy, but it uses easy-to-find, basic ingredients. Here's what you'll need:
- Veggies - The recipe uses a combination of onions, carrots, mushrooms, and asparagus. It's fairly flexible though, and you can swap in your fave vegetables if you wish ... see the Variations section below for tips.
- Herbs - You'll use a combination of fresh herbs (parsley, rosemary, and thyme) for maximum flavor. Sage would also be tasty.
- Garlic - Fresh garlic adds an extra savory element that's super delish.
- Nuts - Chopped nuts add a wonderful texture to the filling. I used walnuts, but pecans and other nuts would work great, too.
- Puff Pastry - This buttery pastry is so fun, and surprisingly easy, to work with. You can find it in the freezer section of your grocery store. For best results, make sure to thaw it in your refrigerator overnight, and keep it refrigerated until just before you're ready to use it.
- Egg Wash - A simple egg wash helps the puff pastry turn a beautiful golden brown.
This recipe makes two Wellingtons, which will feed about eight to ten people.
Vegan Variation
This recipe is already vegetarian, and it can easily be made vegan friendly. Just pay attention to these two things:
- Use vegan puff pastry. This buttery pastry is usually made with (surprise, surprise) butter, so make sure to read the package carefully. Pepperidge Farms Puff Pastry (which is what I used here) is vegan, and it's very easy to find.
- Swap out the egg wash. Instead of brushing the pastry with an egg wash before baking, brush it with a little melted non-dairy butter.
You'll Also Need
You'll need a large skillet to sauté the veggies (this 12-inch skillet is my go-to), a rolling pin, and a baking sheet to cook the Wellington. I also used this super handy pastry mat to roll out the puff pastry. It has measurements right on it, plus it sticks to your table, making it easy (and less messy) to roll out doughs and cookies.
How to Make Vegetable Wellington
Although there are a few steps, this Veggie Wellington is not difficult make. It's totally doable, as long as you have a bit of patience. You'll find a detailed, printable recipe below, but here's an overview of the steps.
Cook the Filling
Start by preparing the mixed vegetable filling:
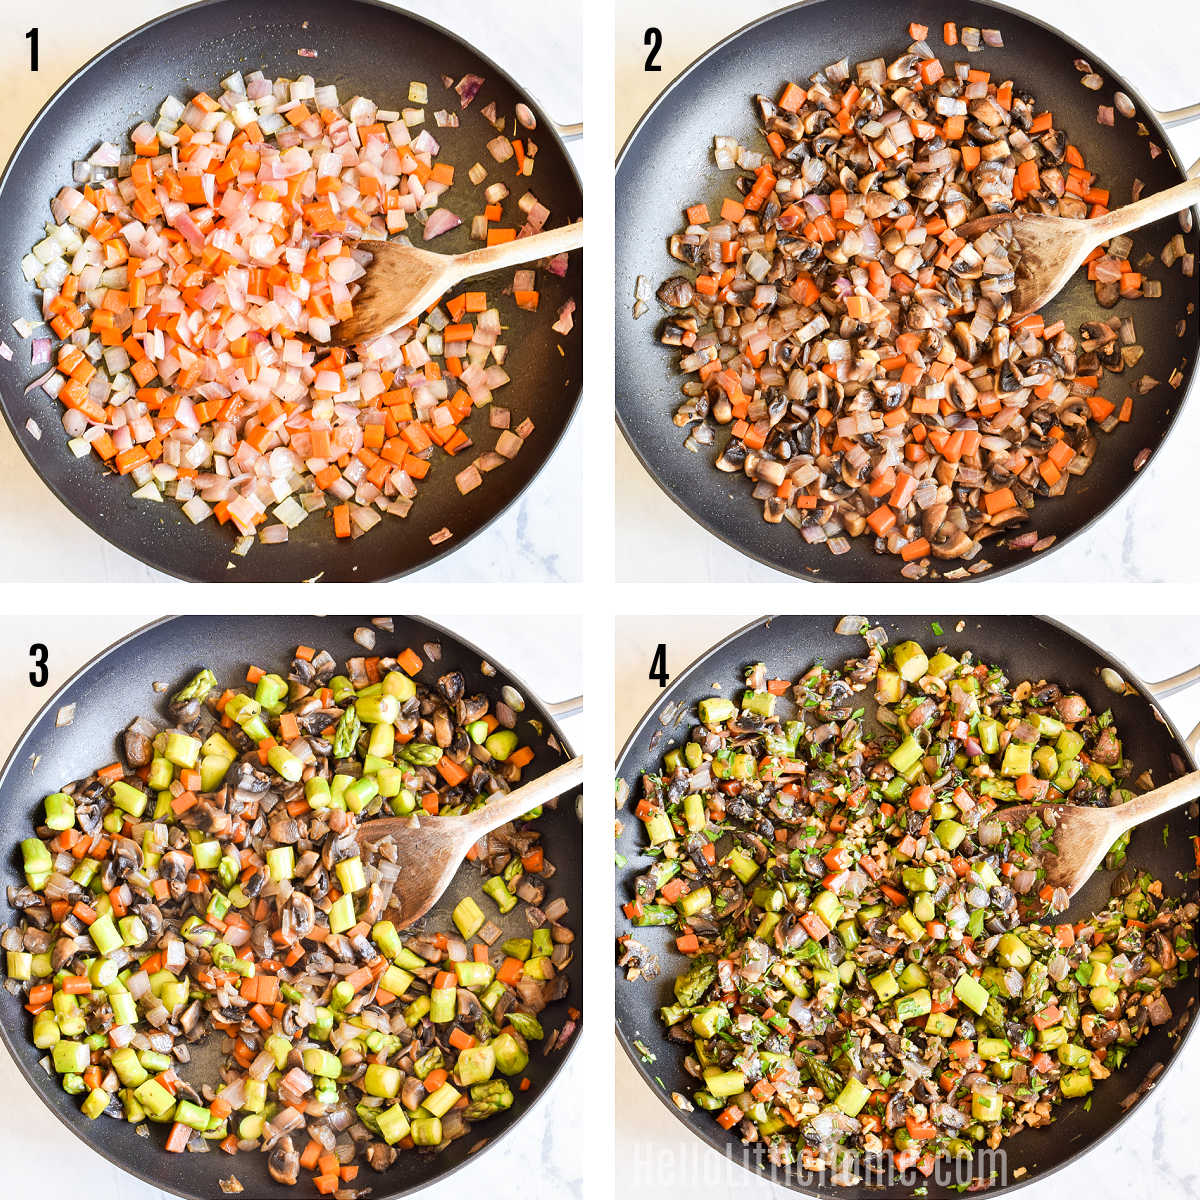
- Sauté the onions and carrots. Season with a little salt and pepper, then cook them until the onion starts to turn translucent.
- Add the mushrooms. Stir in the mushrooms, then cook until they're lightly browned and any liquid they've released has evaporated.
- Mix in the asparagus and garlic. Cook, stirring constantly, for a couple minutes, then remove the pan from the burner. You don't need to cook the asparagus all the way through ... it will continue cooking in the oven.
- Add herbs and nuts. Stir in the fresh herbs and walnuts, then season to taste with salt and pepper.
Tip: Make sure to let this mixture cool before wrapping it with puff pastry. It doesn't have to be cold, but you don't want it to be hot.
Prepare the Puff Pastry
Once you've prepared the filling, and it's cooled slightly, you can work on the pastry.
- Roll out the puff pastry. Lightly flour a board (or use this handy Pastry Mat), top with one sheet of puff pastry, then use a rolling pin to gently roll it out to a 10 x 12-inch rectangle. Pinch any cracks that form together.
- Add the filling. Place half the filling in the center of the pastry, leaving a ½-inch border free on either end.
- Fold pastry over filling. Fold one half of the puff pastry over the filling, then fold the other half over that.
- Fold edges under. Fold the open edges under and pinch to close. Carefully flip over, then place seam side down on a baking sheet. Then, repeat steps 1 through 4 to make the second Wellington.
- Score puff pastry. Using a sharp knife, carefully score the pastry, being careful not to cut all the way through. See below for more tips!
- Brush with egg wash and bake. You'll use a combination of an egg yolk and a little water (or non-dairy butter for a Vegan Wellington) to brush the pastry. This helps the pastry brown and gives it a pretty sheen.
Tip: Make sure to keep the puff pastry refrigerated until you are ready to work on it.

Tips for Scoring Puff Pastry
If you've never used it before, puff pastry can feel a little intimidating. It's actually way easier to work with than you'd think though.
A couple things to keep in mind: first, make sure to defrost the frozen dough in your refrigerator, not on your counter top. If you put it in your refrigerator the night before, it should be defrosted by dinner the next day (if not earlier). Second, keep it refrigerated until you're ready to use it.
When scoring the pastry, use a sharp knife for best results. Then make light cuts in the uppermost layer of the pastry, avoiding going all the way through.
If you do make a small cut all the way through the pastry, don't panic! It will still turn out fine. If you look closely at mine, you can see a few spots where I cut through the pastry.
Here are a couple easy patterns to try:
- Crosshatch Pattern (see top pastry below) - Score the whole pastry with parallel, diagonal lines all going in one direction. Then, turn your knife and score the pastry with diagonal lines going in the other direction.
- Herringbone Pattern (see bottom pastry below) - Score four lines on the top of the pastry (parallel to the long side), dividing the dough into four sections. Then, score the sides of the pastry with one or two more lines (parallel to, and equal in width, to the ones on top). Next, score each section with diagonal lines. Each section's lines should go in the opposite direction as the previous section's lines, but they should connect along the vertical line. You're basically making a series of "v's" (\/\/\/\/\/). Hope that makes sense ... it's easy to do, but hard to explain!

Variations
This recipe is fairly flexible if you want to change up the filling a bit. Here are some easy ideas:
- Veggies - Swap in one or more veggies for the combo of onions, carrots, mushrooms, and asparagus used here. Cauliflower, eggplant, beets, potatoes, butternut squash, pumpkin, root vegetables, and greens, like spinach or kale, would all work great. You could also do roasted veggies rather than sautéed.
- Cheese - This recipe would be delicious with a little cheese added. Try goat cheese, feta, parmesan, or even cheddar.
- Lentils - Add some extra protein by stirring some lentils into the cooked veggies. I'd recommend using French lentils, which hold their shape really well.
- Nuts - I used walnuts here, but other nuts (such as pecans, pistachios, almonds, or chestnuts) will work, too. You could also leave out the nuts if you prefer, or swap in some seeds (like pepitas) instead.
Tip: If you do make substitutions, try to keep the volume of the ingredients the same. And keep in mind that the cooking time may change.

Storage
Store any leftovers in an airtight container in your refrigerator. It will keep for three to four days. Reheat gently in your microwave, or wrap in foil and warm in your oven.
What to Serve with Veggie Wellington
This Vegetarian Wellington is the perfect centerpiece for all your holiday occasions, like Thanksgiving and Christmas! Pair it with all your favorite festive season side dishes.
I served mine with Wild Rice Salad, Pomegranate Brussels Sprouts, Sourdough Stuffing, Cranberry Relish, Sour Cream Mashed Potatoes, and Onion Gravy. Yum!
You could also pair it with Roasted Vegetables (like these yummy Roasted Root Vegetables or this Roasted Butternut Squash), Pomegranate Salad, Wheat Berry Salad, Cauliflower Gratin, or Glazed Carrots.

Related Recipes
If you loved this recipe, then make sure to check out my Mushroom Wellington, too ... it was the inspiration for this recipe! Looking for other special occasion vegetarian entrees? Try one of these recipes next:
- Roasted Vegetable Tart
- Butternut Squash Lasagna with Kale and Mushrooms
- Vegetable Pie with Phyllo Crust
- Creamy Mushroom Strudel
- Moroccan Spiced Vegetarian Cabbage Rolls
- Stuffed Acorn Squash
- Sweet Potato Shepherd's Pie (or my fave Vegetarian Shepherd's Pie)
Looking for more puff pastry recipes? You'll love my Tarte Soleil and Baked Brie recipes, too!


Vegetable Wellington
Ingredients
- nonstick cooking spray
For Filling:
- 1 tablespoon extra virgin olive oil
- 1 large red onion, diced (about 2 cups)
- 1 large carrot, peeled and diced (about ¾ cup)
- 1 pound mushrooms, chopped
- 1 bunch asparagus, cut into ½-inch pieces
- 2 large cloves garlic, minced
- ¼ cup chopped walnuts, lightly toasted
- ¼ cup chopped flat leaf parsley
- 1 tablespoon minced fresh rosemary
- 2 teaspoons fresh thyme leaves
- kosher salt
- pepper
For Pastry:
- 2 sheets puff pastry, chilled
- all-purpose flour
- 1 egg yolk
Instructions
- Preheat oven to 425 degrees. Lightly spray baking sheet with nonstick spray; set aside.
Prepare Filling:
- Heat olive oil in a large skillet over medium heat. When hot, add onion and carrot. Season lightly with salt and pepper, then cook until onion is translucent, stirring occasionally (about 7 to 10 minutes).
- Add mushrooms, then cook until lightly browned and any liquid that's released has evaporated, stirring occasionally (about 7 to 10 minutes).
- Stir in asparagus and garlic, and cook until asparagus is bright green and garlic is fragrant, stirring very frequently (about 2 to 3 minutes).
- Remove pan from heat, then stir in walnuts, parsley, rosemary, and thyme. Season to taste with salt and pepper. Set aside to cool.
Assemble Pastry:
- Remove one sheet of puff pastry from refrigerator. Unfold and place on a lightly floured board. Sprinkle top of pastry lightly with flour.
- Using rolling pin, roll pastry out to a 10 x 12-inch rectangle. Pinch together any tears in the pastry.
- Place half the cooled filling down the center of the puff pastry, leaving a ½-inch border on either end.
- Fold one side of the pastry over the filling, then fold the other side over that. Fold open ends under, then pinch together seams.
- Carefully flip Wellington and transfer to baking sheet (seam side down), then repeat process with remaining filling and puff pastry.
- Use a sharp knife to lightly score a pattern into the puff pastry, being careful not to cut all the way through.
- Whisk together egg yolk and 2 teaspoons cold water. Brush over top and sides of puff pastry with a pastry brush.
- Bake Wellingtons until puffed and golden, about 35 to 40 minutes, rotating pan in oven halfway through baking.
- Use a serrated knife to cut each Wellington into 4 to 5 slices. Serve hot. Enjoy!
Notes
Nutrition
This sounds amazing! Pinned.
Thanks, Joanne! 🙂