• Skip to primary navigation
  • Skip to main content
  • Skip to primary sidebar
Hello Little Home
  • Recipes
    • Appetizers
    • Breads
    • Breakfast
    • Desserts
    • Drinks
    • Main Dishes
    • Salads
    • Sandwiches
    • Sauces + Condiments
    • Side Dishes
    • Soups
    • Kitchen Tips
  • Travel
  • Decor
  • DIY
  • Lifestyle
    • Beauty + Style
    • Blogging
    • Health + Fitness
    • Holidays
    • Party Ideas
  • Subscribe
  • About
menu icon
go to homepage
search icon
Homepage link
  • Recipes
  • Travel
  • Decor
  • DIY
  • Lifestyle
  • About
    • Email
    • Facebook
    • Instagram
    • Pinterest
  • ×
    Home » Lifestyle » Beauty » Easy Wide Stripe Nail Art Tutorial

    Easy Wide Stripe Nail Art Tutorial

    Published Nov 5, 2014 · Updated Feb 20, 2018 by Ginnie · 11 Comments

    Pin
    Share
    Email

    This easy Wide Stripe Nail Art tutorial is a great way to try your hand at nail art! It couldn't be easier and is perfect for beginners!

    Easy Wide Stripe Nail Art Tutorial! Learn how to add horizontal stripes to your nails with tape … it's simple and the results are awesome. This step by step DIY stripe nail art tutorial is a fun and classy way to experiment with nailart, and it's perfect for beginners. Includes tips for choosing polish color combos for the prettiest manicures! | Hello Little Home #nailart #nailarttutorial #manicure #diymanicure #easynailart #stripenailart

    This post contains affiliate links.

    I love intricate nail art, and if you spend any time on Pinterest, I'm sure you've noticed all the great inspiration out there.

    Unfortunately, my nail art skills are just not that good. Sure, I can do a good-looking basic manicure, but anything more difficult than that and my fingers just will not cooperate!

    So when it comes to nail art, it's the simpler the better for me. This easy Wide Stripe Nail Art tutorial is just my thing! The stripe adds a big impact to your nails, but it couldn't be easier to accomplish. Plus, no special tools are necessary.

    Not only is this manicure simple, but it's also perfect for the holidays. Especially if you use a pretty golden color on your tips like I did. It's gorgeous with any color combo though, so have fun experimenting!

    Easy Wide Stripe Nail Art Tutorial: Supplies | Hello Little Home #beauty

    Easy Wide Stripe Nail Art Tutorial

    Want to replicate this nail art stripe design on your own nails? Here's what you'll need:

    • base coat (I like Orly Bonder.)
    • top coat (Seche Vite is a fave.)
    • 2 contrasting nail polish colors (I used Zoya Kendal and Julep Sienna.)
    • removable tape (I used painters tape, but transparent tape works, too.)
    • nail polish remover or a manicure clean up pen

    Start by applying the base coat. My absolute favorite is Orly Bonder. It has a unique rubberized finish that really grips polish and makes my manicures last.

    After the base coat dries, apply the first color all over your nails. This is the color that will show on the lower half of your nails. I used Zoya Kendal, a pretty, grayish lilac.

    This color should be opaque, so apply as many coats as needed.

    Easy Wide Stripe Nail Art Tutorial: Applying Base Color | Hello Little Home #beauty

    This first layer of polish MUST be completely dry before proceeding, so add a fast dry top coat (I used Seche Vite), place your painted nails in a bowl of ice water, or just be patient (not my strong suit).

    Seriously though, do not apply the tape until your polish is hard as a rock ... ask me how I know this!

    When the polish is dry, add a strip of tape horizontally across your nails about halfway from the tip of each nail. Smooth out the tape, getting rid of any gaps between the tape and your nails.

    Apply your second color, pulling the brush toward the tips of your nails. This will help avoid any nail polish seeping under the tape.

    I used Julep Sienna for the tips of my nails. It's a gorgeous, shimmery gold that I plan to wear throughout the holidays!

    Easy Wide Stripe Nail Art Tutorial: Applying Gold Polish | Hello Little Home #beauty

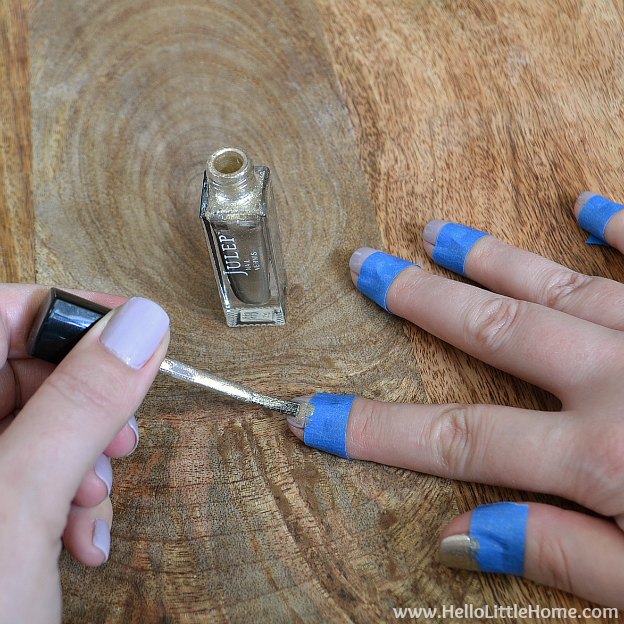
    Apply enough coats to make the polish opaque and then slowly remove the tape strips.

    You do not need to let this second color of polish dry before removing the tape.

    Removing tape from wide stripe nail art.

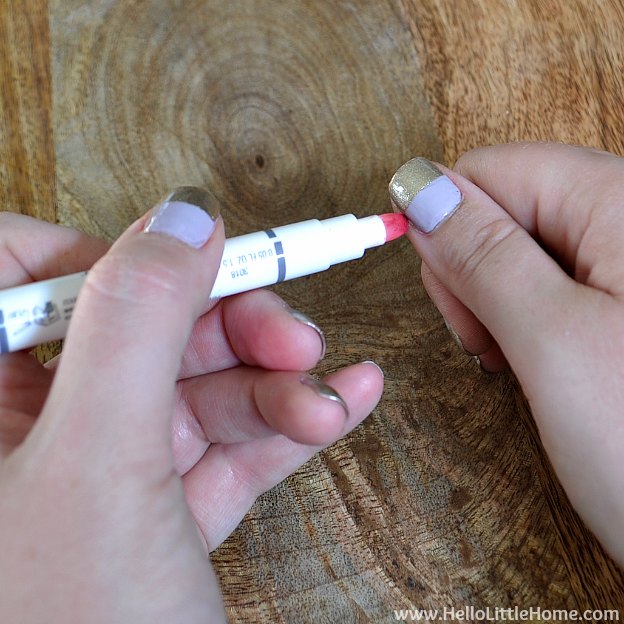
    Use nail polish remover or a manicure pen to remove any excess polish around your nails.

    My Sally Hansen Nail Clean Up Pen is very well used, as you can see below. It comes with extra tips, so you can add more nail polish remover and a clean tip when needed.

    I'm out of tips, so time for a new pen!

    Easy Wide Stripe Nail Art Tutorial: Clean Up | Hello Little Home #beauty

    Finish your wide stripe nail art with a quick drying top coat. I used my favorite, Seche Vite, again.

    Look at those pretty nails!

    Easy Wide Stripe Nail Art Tutorial | Hello Little Home #beauty


    Hands with easy Wide Stripe Nail Art holding a coffee mug.

    This nail art is the perfect way to add a little bling to your nails during the holidays.

    The gold tips would be be so pretty with a deep red or even a more subtle cream. Get creative!

    This pretty nail art would also work with different colors instead of a metallic. Go subtle with pink and gray or bold with bright pink and orange.

    Testing the colors together on a piece of paper before you start is a great way of finding complimentary combinations.

    Easy Wide Stripe Nail Art Tutorial! Learn how to add horizontal stripes to your nails with tape … it's simple and the results are awesome. This step by step DIY stripe nail art tutorial is a fun and classy way to experiment with nailart, and it's perfect for beginners. Includes tips for choosing polish color combos for the prettiest manicures! | Hello Little Home #nailart #nailarttutorial #manicure #diymanicure #easynailart #stripenailart

    What colors would you pair together for this manicure?

    P.S. If you like this post, you may enjoy my easy striped-nail art tutorial (similar name, completely different look)!

    Pin
    Share
    Email
    « Pumpkin Frozen Yogurt
    15+ Thanksgiving Decor Items To Be Thankful For! »

    About Ginnie

    Ginnie is the writer, photographer, and chief content creator behind Hello Little Home. She loves trying new things (whether that’s creating delicious vegetarian recipes, exploring a new city, trying a fun DIY project, or sharing a pretty makeup look), and she hopes to inspire you to do the same! Read more about Ginnie here.

    Subscribe
    Notify of
    Recipe Rating


    Recipe Rating


    This site uses Akismet to reduce spam. Learn how your comment data is processed.

    11 Comments
    Inline Feedbacks
    View all comments
    Annapurna Dwivedi
    4 years ago

    I loved your tutorial

    0
    Reply
    sarah
    9 years ago

    I Like your tutorial, I will try it to night, thanks 🙂

    0
    Reply
    Author
    Ginnie
    9 years ago
    Reply to  sarah

    Thanks, Sarah! Let me know how it goes! 🙂

    0
    Reply
    Lou Lou Girls
    10 years ago

    So pretty! Pinned. Lou Lou Girls

    0
    Reply
    Ginger
    10 years ago

    Pretty. I need to do something with my nails!

    0
    Reply
    Kyla — HouseOfHipsters.com
    10 years ago

    You nails look awesome! LOVE! Thanks for sharing! I think it would be perfect for my new linky party starting this Saturday at 8pm called “Found & Foraged” Can’t wait to party with you at http://www.houseofhipsters.com

    0
    Reply
    anne @ wit wisdom and food
    10 years ago

    I love the colors. I am a terror on manicures and they only last a few days but I may try this for a special occasion coming up.

    0
    Reply
    DESPINA P
    11 years ago

    Smart idea!

    0
    Reply
    Heather Smith {Woods of Bell Trees}
    11 years ago

    SUPER cute! I def need one of those pens...I am realllllly messy with nail polish!

    0
    Reply
    Dawn Nicole (@ByDawnNicole)
    11 years ago

    SO fun, Ginnie!! Love it! Pinning to share! 🙂

    0
    Reply
    Delisa Parrish
    11 years ago

    Love the colors and design!

    0
    Reply

    Primary Sidebar

    Ginnie Headshot

    Hi, I'm Ginnie! Welcome to Hello Little Home, which is all about inspiring everyday creativity! I'm excited to share my favorite things with you ... vegetarian recipes, travel inspiration, DIY projects, decor ideas, beauty and fashion tips, and more! Read more about me here!

    FOLLOW ALONG

    • Email
    • Facebook
    • Instagram
    • Pinterest
    • YouTube

    Newsletter

    Keep up with all things Hello Little Home ... sign up below to receive my weekly newsletter!

    You'll get all my posts delivered straight to your inbox, plus exclusive content just for subscribers.

    Footer

    ↑ back to top

    Featured By

    A graphic with logos from media outlets Hello Little Home has been featured by, including Martha Stewart, Home Depot, Good Housekeeping, House Beautiful, Parade, HGTV, BuzzFeed, and more..

    Information

    • Contact
    • Privacy Policy
    • Disclosure Policy
    • Terms & Conditions
    • Web Stories

    Newsletter

    Never miss a post ... Sign Up for our weekly newsletter

    Connect

    • Facebook Icon
    • Pinterest Icon
    • Instagram Icon
    • Twitter Icon
    • YouTube Icon
    • RSS Feed

    Copyright © 2022 Hello Little Home

    wpDiscuz