Learn how to make DIY Monogram Coasters with this fun and easy tutorial!

This post contains affiliate links.
Coasters are one of those crafts that I keep coming back to. There are just so many ways to decorate them, and they don't require a big time commitment ... win win.
These DIY monogram coasters with stripes are so easy to make. They're also the perfect tabletop accessory and make a great gift, too!
I love a quick and dirty DIY project, especially if it can be personalized. There's nothing like (near) instant gratification, right?

DIY Monogram Coasters
I can't get enough of bright, summery colors right now, so I decided to use my favorites for these striped coasters. The monogram adds a wonderful personalized touch.
These coasters only take a few minutes to make, so make sets for all of your friends!


How to Make Monogram Coasters
Want to make your own DIY monogram coasters with stripes? Here's what you'll need:
- cork coasters
- craft paint (I used FolkArt Vintage White, Light Blue, and Pure Gold, and Martha Stewart Hydrangea Purple.)
- foam paint brush
- painters tape
- computer and printer
- card stock
- scissors
- pencil
- small angled paint brush
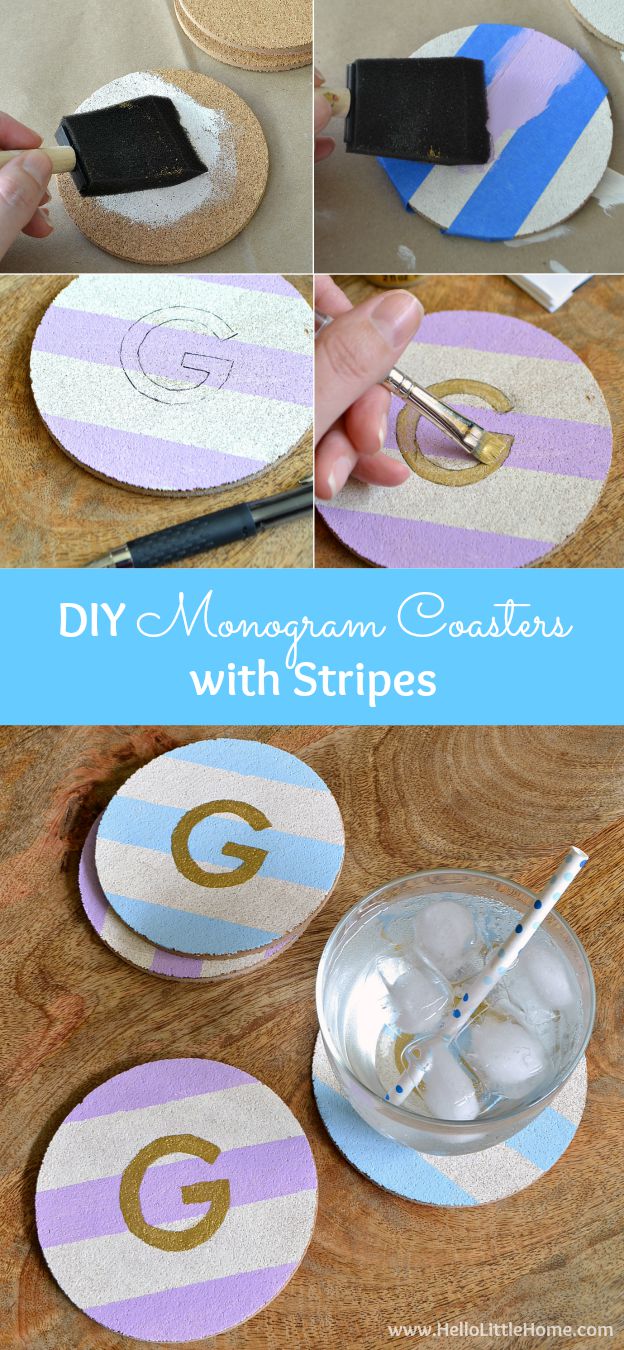
You'll need at least three shades of craft paint: two (or more) for the stripes and one for the monogram. Start by painting the coasters with the paler of the two shades you plan to use for the stripes. I used FolkArt Vintage White as my base color.

Painting the Coasters
Let the paint dry, then mark off your stripes with painters tape. I eyeballed the tape placement, but if you want perfectly even stripes, then measure everything out. For more stripes, use thinner painters tape.
Paint the non-taped areas with your other stripe color. I wanted a mix of colors for my coasters, so I used FolkArt Light Blue and Martha Stewart Hydrangea Purple.
When you are finished painting the stripes, remove the painters tape and let the paint dry.

Adding the Monogram
While the paint is drying, work on the monogram.
I opened up a Microsoft Word file and played around with different fonts until I found one I liked. Keep in mind that script or any font with a lot of detail will be hard to cut out later.
If you don't want to deal with a computer, use a stencil or draw out the monogram by hand.

I ended up using Futura and sized it up to 160. Each font is different so play around with the size until you find one that works for your coasters.
After you find the right font and size, print the monogram on card stock, then cut it out.
Position the letter on your coaster and trace around it lightly with a pencil. By the way, I used a pen for my first coaster, and it made a mess when I started painting. Stick with a pencil!

Carefully fill in the letter using the angled paint brush.
I used FolkArt Pure Gold, my all-time favorite gold, for my monogram. Add additional coats, if necessary. I needed two.

Let everything dry, then your DIY monogram coasters with stripes are ready to use!
How easy was that?
I love how cheery and summery these coasters turned out. If pastels aren't your thing though, keep in mind that they can be customized with any colors you'd like. Have fun!


To give these DIY monogram coasters as a gift, tie them together with some pretty ribbon or bakers twine ... simple and pretty!
What is your favorite quick and easy DIY project?

Love these, Ginnie! Even I could make these!
Thanks, Amy! They are super quick and easy! 🙂