Learn how to set up an awesome candy-covered DIY Ice Cream Sundae Bar! This fun do it yourself ice cream bar is the perfect birthday cake alternative and makes a wonderful treat for any party!
This post contains affiliate links. As an Amazon Associate I earn from qualifying purchases.
If you're looking for a creative party idea, I've got you covered!
This DIY ice cream sundae bar is truly a candy lover's dream. It's the perfect way to celebrate summer!
There's no cooking or even a lot of planning involved in this ice cream bar, which leaves lots of time for summer fun! It's perfect for serving at a BBQ, birthday party, or even a relaxing night at home with the family ... I mean, who doesn't love candy?
I'm going over all the details and showing you how to make an ice cream sundae bar ... from sundae bar topping ideas (candy, lots of candy!) to ice cream sundae bar supplies below. Plus, I'm sharing my favorite presentation ideas to make your DIY sundae bar pop.
Keep reading for all the yummy details!


Ice Cream Sundae Bar Supplies
Ready to set up your own dessert bar? Here are the supplies you'll need:
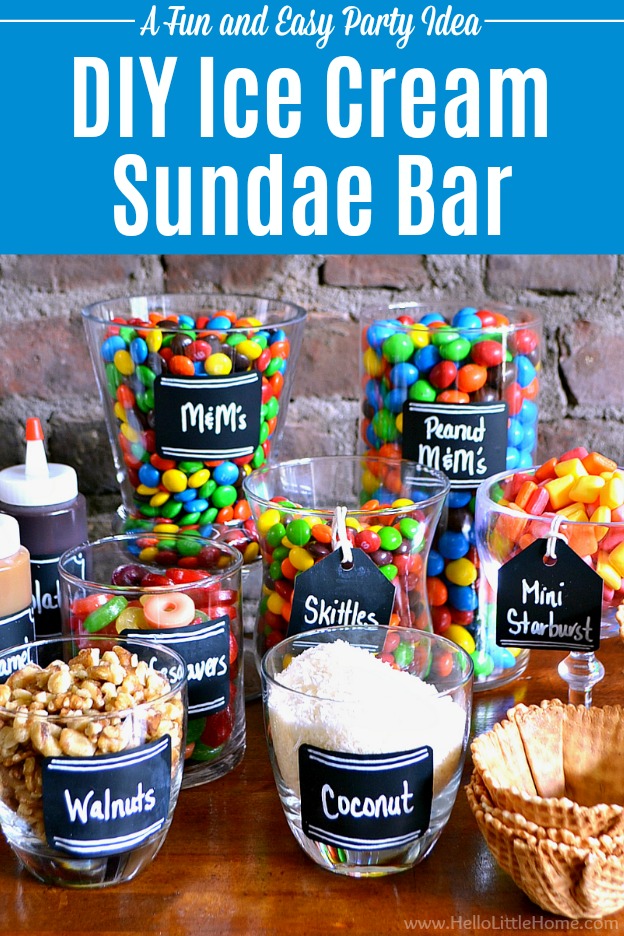
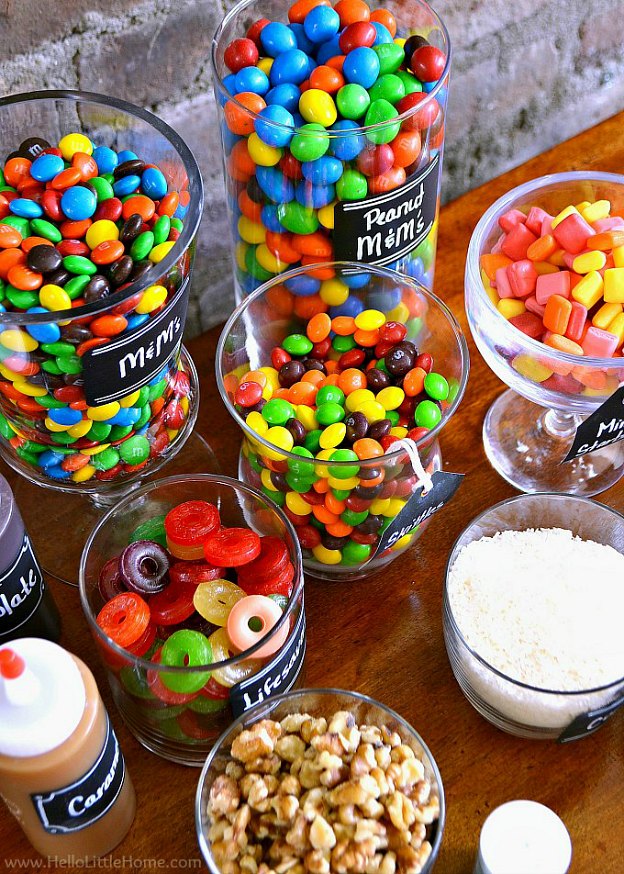
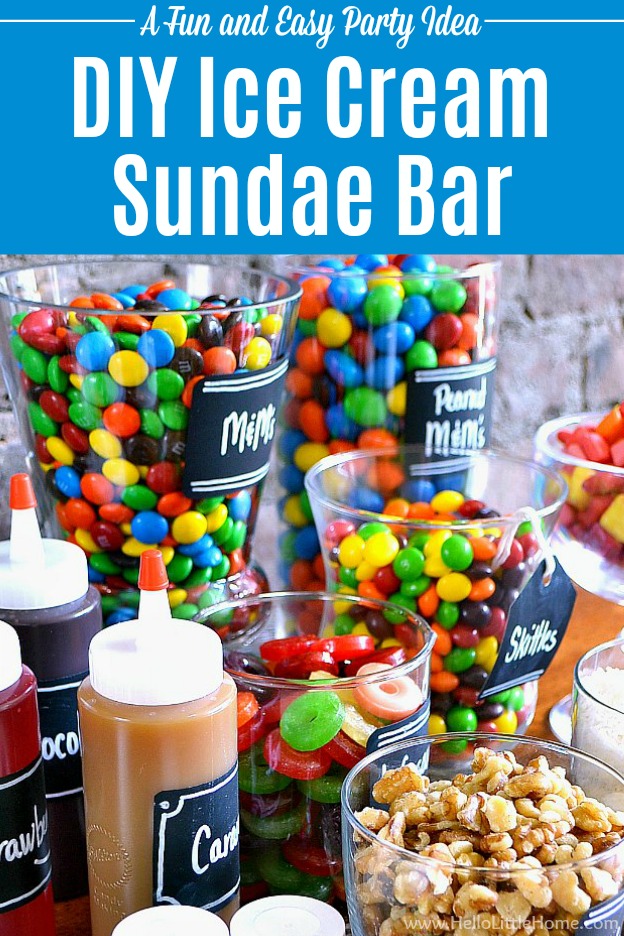
- Candy (I used Skittles, M&M's Plain, M&M's Peanut, and Starburst Minis.)
- Ice Cream Sauces (I used chocolate, strawberry, and caramel, but this Ghiradelli set would work well, too.)
- Other Toppings (I added chopped nuts, coconut flakes, and sprinkles, but get creative with other toppings such as whipped cream, fresh fruit, chocolate chips, and anything else you can imagine or have in your cupboard!)
- Ice Cream (I used vanilla but a mix of flavors would be fun.)
- Mix of glass containers
- Chalkboard Tape or Chalkboard Labels
- Corner Rounder
- Chalkboard Marker
- Baker's Twine
- Plastic Squeeze Bottles
- Serving Spoons or Scoops
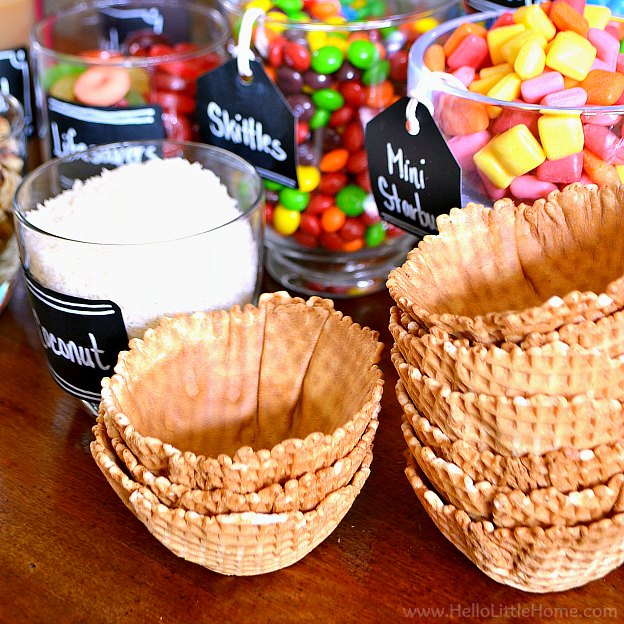
- Waffle Bowls or Other Serving Dishes
- Spoons

How to Set Up a Sundae Bar
I wanted to show off the candy in this dessert bar, so I served it in a mixture of glass containers. If you're trying to save money, search your home for vases, bowls, and anything else that may work. Try to choose containers in a range of heights and sizes for the most visual appeal.
Pour the candy into the containers you've gathered. Feel free to sample as you work!
Creating the Labels
To make your DIY ice cream sundae bar extra special, you can label the candy. I used chalkboard tape (although you could also use chalkboard labels), and it was perfect for labeling my glass containers!
I simply cut the tape to the size I wanted and used a corner rounder on the edges. Then I used a chalkboard marker for the writing. After your labels are dry, simply peel the backing off the chalkboard tape and apply it to your containers. It was so easy, yet such a fun touch!
Don't have or don't want to purchase chalkboard tape? Regular paper will work as well. Just attach it to your containers with double-sided tape.

For my containers that weren't flat, I cut out tags instead. I punched a hole in the tags, inserted a little baker's twine, and then attached the twine to the inside of the containers.
A little tape will hold the twine in place, or you can just bury the twine under the candy like I did.

I wanted a cohesive look for my DIY ice cream sundae bar, so I transferred the syrups to squeeze bottles.
Of course, I had to label those as well!

Organizing the Sundae Bar
The last step is arranging your DIY sundae bar.
Place your larger containers in back and your smaller ones in front. Don't forget to add spoons/scoops for serving the candy, ice cream bowls, and spoons for eating.
If you don't want to spend a lot of time scooping ice cream, scoop it out ahead of time, place it on a baking sheet, and freeze it. Come party time, all you need to do it transfer the scoops directly to the bowls.
You could also have a designated ice cream scooper ... it's up to you!

My favorite part of this DIY ice cream sundae bar was how colorful it looked.
And of course, all the candy ... yum!
l found these awesome waffle bowls to serve the ice cream in.
They were super delicious, plus there were no dishes to clean up after the party. How awesome is that?
Ice Cream Sundae Bar Topping Ideas
For this party, I stuck mainly to candy. The sky is the limit though when it comes toppings.
Here are a few ideas:
- Candy ... of course!
- Chopped Nuts
- Coconut Flakes or Chips
- Sprinkles
- Whipped Cream
- Fresh or Dried Fruit
- Homemade Mixed Berry Compote
- Chocolate Syrup (and other flavored syrups)
- Fruit Syrups / Toppings
- Marshmallows
- Brownies or Cake
- Pretzels
- Maraschino Cherries
- Chocolate Chips (and other kinds of chips, like peanut butter, toffee, etc.)
- Espresso ... turn your sundae into an Affogato!
- Anything else you can find in your cupboard!
Coming up with sundae bar topping ideas is the best part. I loved mixing and matching all that candy!
I'm calling that last combo below Pretty in Pink! It's covered in pink and other fun summer colors. I used candy, sprinkles, and lots of strawberry sauce.
Isn't it cute?

This sundae bar is the perfect way to create summer fun!
Just gather your ingredients and invite your friends over. It's guaranteed to be a hit with kids and adults alike!
More Party Ideas
If you enjoyed this dessert bar idea, make sure to check out my Waffle Sundae Bar, too. It's a similar idea with a fun twist!
I've got lots of other party tips, too. Check out all of my party ideas here!

What candy combination would you create for the ultimate sundae?
Hello.
This idea is so great ! How do you manage to keep the ice cold ?
Thank you so much, Mary! I would bring the ice cream out right before serving. That way it will stay cold longer. You could also place the carton over a bowl of ice to keep it cold for longer. Hope that helps! 🙂
what about serving the ice cream? did they scoop it themselves or did someone do that? we're having an ice cream social for about 40 people and I was wonder how to serve up the ice cream, maybe pre-scoop??
Hi, Sheila! For a crowd that large, I would either designate one (or two people) to be ice cream scoopers, or pre-scoop the ice cream and then refreeze it.
Hi Ginnie!
I just came across this on Pinterest and I'm thrilled it's from you! (I know Joel from high school,) I'm going to use this idea for our end of the year school party as well as my son's summer birthday party.
Thanks! Your ideas are fantastic.
Jen
Hi Jen! That is such a happy coincidence, and you are so sweet. 🙂 So glad you found this idea and hope your son has a very happy birthday!
Thank you so much for this amazing idea! We will be adding the ice cream bar, to my son's party this weekend!
You're welcome, Lisa! I hope you have a wonderful party! 🙂
where did you get the waffle cups at?
Hi, Penny! I got them at Walmart, but you can also find them on Amazon. There's a link in the profile.
This is so cute, Ginnie! I'd say my son and his friends would love this, but I think all of the adults I know, would, too!
Ha ha ... I feel the same way! It's fun for everyone! 🙂
This is a great idea and I love all the candy options! Pass me a waffle bowl please! (client)
Thanks, Samantha! Sending one candy filled waffle bowl your way! 😉