Looking for creative things to do with cigar boxes? Learn how to make a cute Cigar Box Photo Frame! This homemade picture frame is super easy to put together and a great way to show off a favorite photo ... it makes a lovely personalized gift, too!

This post contains affiliate links. As an Amazon Associate I earn from qualifying purchases.
I come from a crafty family! My mom was always making something, and she taught me how to use a hot glue gun, knit, sew, and so much more. At some point, she collected a bunch of cigar boxes. She never used them though ... instead, she gave them all to me!
Over the years, I've found all sorts of ways to use those wooden boxes. I've repurposed them into artsy shadow boxes, used them as gift boxes, and even made a DIY cigar box chalkboard (one of my all-time favorite projects).
This DIY Cigar Box Photo Frame is my latest idea for these empty boxes, and I can't wait to show you how to make it!
You are going to love this colorful frame! The original details from the cigar box add so much color, pattern, and character to the finished frame ... each frame is truly one of a kind. Best of all, it requires just a few supplies and minimal effort: and there's no cutting or sawing wood required, just a little painting and gluing.
Ready to get started? Then keep reading for to learn how to make your own frame!


Supplies
If you've ever wondered what to do with empty cigar boxes, this fun + easy project is for you! Here's what you'll need:
- Cigar Box - Keep an eye out for empty cigar boxes at flea markets, vintage stores, and secondhand shops. Many cigar and liquor stores also sell the boxes once they're empty.
- Utility Knife - You'll need a utility knife to trim the lid from the box.
- Glue - Grab some craft glue to attach any loose bits of trim and paper.
- Painters Tape - If you choose to paint the inside of the box, painters tape will keep all your edges neat, while also protecting the box's patterned trim.
- Brush - You'll use a foam brush to apply craft paint to the box.
- Paint - Craft paint works perfectly for this project, and you can find it in so many different colors. (I kept things simple, and used FolkArt Vintage White.)
- Corner Punch - Because the photo doesn't have a mat, you can make it look more finished by trimming the edges with a corner rounder. This punch is similar to the one I used.
- Foam Squares - Add a little depth to the shadow box frame by attaching the photo with foam mounting squares.
- Photo Corners - If you'd prefer to mount the photo on a piece of paper instead of directly to the box, you can use clear photo corners.

How to Make a Cigar Box Photo Frame
Ready to get started? This project is really simple, and I'm going to walk through each step one at a time. You can also find printable instructions at the end of the article.
1. Remove paper lining. Most cigar boxes are lined with paper. Start by pulling this paper out as carefully as possible. If any of the paper sticks, peel as much off as you can. You don't want any loose edges.

2. Remove box lid. Next, you need to remove the lid. Use the utility knife to cut through just the inside layer of the paper connecting the lid to the box (as shown below). Then, pull the lid off, carefully separating the patterned paper on the outside from the lid.

3. Glue decorative paper to box. Once you've separated the lid from the box, fold the patterned paper from the outside of the box toward the inside of the box. Paste it in place with the craft glue.

4. Decorate the inside of the box. There are a few ways to finish the box:
- Leave the wood as-is. If you choose this option, you may need to sand it down a bit anywhere there's paper still glued on.
- Cover the inside of the box with paper. You can attach the paper with a thin layer of glue. Just be aware that the paper may warp slightly as it dries (use thin coats to avoid this).
- Paint the inside of the box.
I decided that it would be easier to paint the box using craft paint and a foam brush. Because cigar boxes are made from really porous wood, you'll need to add a few layers of paint (mine took four coats, although you could use fewer for a white-washed look). The paint does dry fast, and you can use a hair dryer to speed things up, if you want.

To protect the patterned paper on the sides of the box, cover it with painters tape before starting. Then add enough coats of paint (letting each coat dry before adding another layer) to evenly cover the wood.

5. Prepare the photo. I had some leftover holiday cards, so I decided to use one of the leftover cards for my photo. It worked great because it was already printed on sturdy paper.
To make the photo look more finished, you can use a corner rounder on the edges. This easy to use tool will remove the points, creating a curved edge.

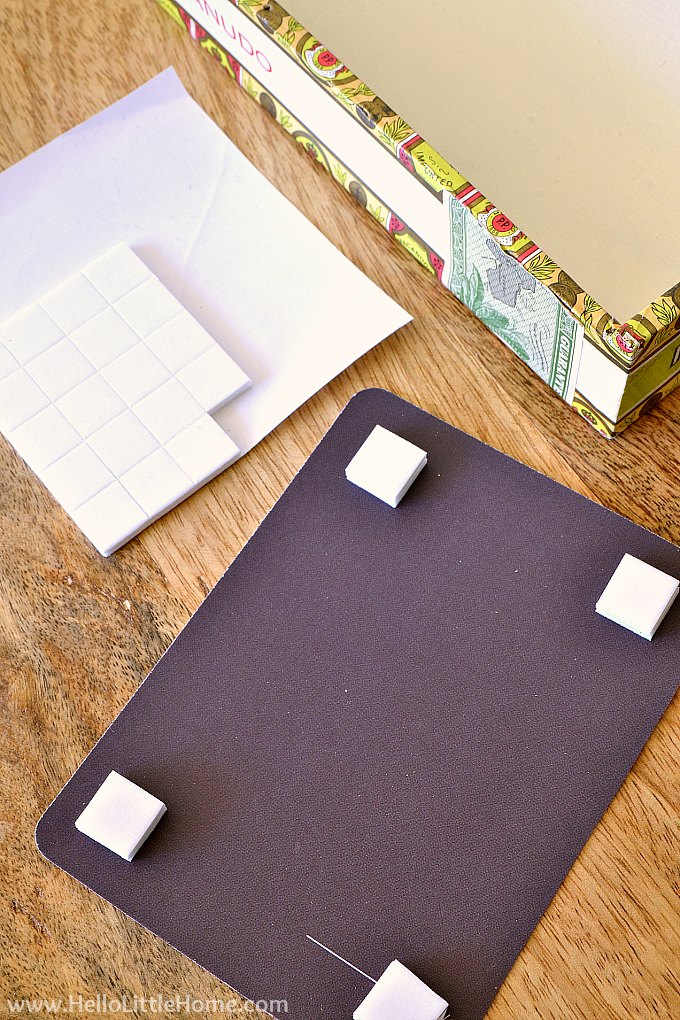
6. Mount the photo to the box. If you want, you can attach the photo right to the box, but it will look better if you create a little dimension. An easy way to do this is with mounting squares.
You'll simply attach a foam mounting square to the back corners of the photo (as shown below). I actually used two layers of mounting squares in each corner for a little extra height.
Once the mounting squares are attached, simply press the photo onto the back of the shadow box. I eye-balled the placement, but feel free to measure the exact location if you prefer. Don't press the corners down until you're totally sure of the photo placement. That way you can adjust the pic a little if you need to.
Alternate Photo Mounting Option: Another option is to attach the mounting squares to a plain piece of paper, then attach the photo to the plain paper with clear photo corners. That way, you'll be able to remove the photo later without damaging it.
And that's all there is to it ... your DIY Cigar Box Photo Frame is finished. Wasn't that easy?
I'm absolutely in love how this homemade shadow box frame turned out! It's so cute that I'm tempted to make another one, although I'm down to my last cigar box. So I need to be a little stingy.


More Crafty Ideas
Let me know if you make your own picture frame ... I'd love to see how it turns out! And if you liked this handmade photo frame, here are some other photography projects you'll love, too:
- DIY Canvas Mounted Instagram Photos
- Cheap + Easy DIY Photo Display
- How to Create a Yearly Family Photo Book
- Easy Picture Frame Makeover
And make sure to check out my DIY Cigar Box Chalkboard (below), too, if you're looking for other cigar box craft ideas.
P.S. Stop by The Shabby Creek Cottage for more do it yourself picture frames from some of my fellow bloggers!


Cigar Box Photo Frame
Equipment
- 1 cigar box
- utility knife
- craft glue
- painters tape
- foam paint brush
- craft paint
- corner punch
- foam mounting squares
Instructions
- Open box, then carefully remove paper lining from box.

- Using a utility knife, cut through the inside layer of the paper connecting the lid to the box. Then, pull the lid off, carefully separating the patterned paper on the outside from the lid.

- Fold the patterned paper from the outside of the box toward the inside of the box. Paste it in place with the craft glue.

- Decorate the inside of the box with paint, paper, etc.
- Use a corner rounder to trim the edges of the photo, if desired.
- Attach mounting squares to the back of the photo. (I used two on each corner for more height.)
- Position photo in box, then press firmly into place.


Cute! Makes me wish I had some of my grandpa's old cigar boxes. Visiting from BFF party.
Thanks, Victoria! That would have been such a sweet memento 🙂
What a cute idea! In elementary school I remember the teacher had us use cigar boxes for our pencils, etc. Can you imagine if a teacher asked a child to bring in a cigar box these days? Ha! They are great for storage and the cute pattern on yours makes a pretty frame.
Ha ha ... that is so true! The pencil boxes I used in school did look a lot like cigar boxes, so maybe that's where the idea came from. 😉