Organize your office, back to school, or creative supplies with a fun and easy to make DIY Zipper Pouch!

This post contains affiliate links for the products I used to create this DIY Zipper Pouch.
I haven't been back to school in years, but I still get an urge to stock up on supplies and revamp my wardrobe every August.
Does that feeling ever go away?
School or no school, organizing pens, markers, and colored pencils can be a challenge. One of my favorite ways to corral these supplies is with a cute pouch.
You can use any fabric you'd like to make this fun Zippered Pouch, or download my free Like a Boss printable!

DIY Zipper Pouch
I've got a ton of random craft supplies that I've collected over the years. If you're a crafter like me, I'm sure you can relate!
I love browsing through my stuff and waiting for inspiration to strike. The other day, I came across a pack of computer printer fabric that I had used to create a No Sew Valentine's Day Flag earlier this year. (Check it out. It's sooo cute!)
Anyway, inspiration struck just like I hoped it would, and I wound up using the computer printer fabric to make a sweet little pencil pouch.
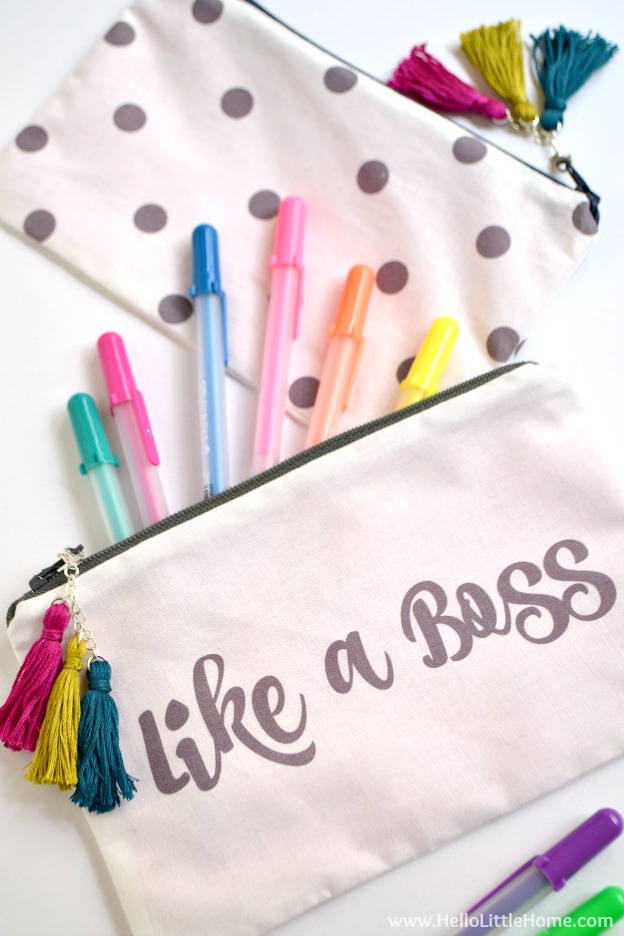
I can't get over how cute this DIY Zipper Pouch turned out!
It's the perfect way to organize school supplies or anything else you can think of.
The front of this adorable bag has an inspirational Like a Boss message, and the back is polka dots. I ending up loving the the polka dots so much that I also created an all polka dot version. Two pouches is better than one!

I'm sharing a free printable for my design so you can make a bag, too! To create your own Like a Boss DIY Zipper Pouch, all you need to do is print my design on computer printer fabric, then sew it up following my simple tutorial.
It's so easy to create these cute bags ... I swear. You'll be sewing them up in multiples before you know it!
One of my favorite things about these DIY pouches are the optional tassels! I absolutely love a tassel (or ten), and the tassel charm adds the perfect quirky pop of color to these Like a Boss DIY Zipper Bags. I can't stop staring at those tassels ... so cute!
Want to create your own custom designed zipper pouch? I've got you covered there, too, and it's super simple.


Zippered Pouch Supplies
To keep things simple, I've broken the tutorial for this Like a Boss DIY Zipper Pouch into two sections. Here's what you'll need for the bag:
- Like a Boss Printable (scroll to end of post)
- computer printer fabric OR your choice of fabric (cotton / quilting fabric works best and comes in tons of patterns and colors)
- ink jet printer
- Iron On Fusible Interfacing, optional
- lining fabric
- scissors
- sewing pins
- 7-inch zipper
- sewing machine
- thread
- iron
How to Create Custom Fabric for Your Pouch
Before I jump into the pouch tutorial, I want to quickly tell you how to create a custom design! If you're using purchased fabric, just skip down to "How to Make a Zipper Pouch".
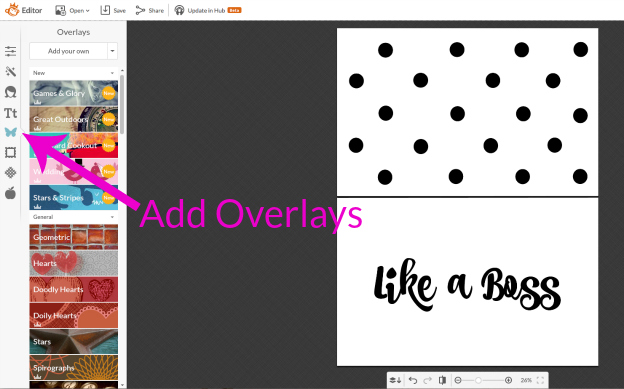
I created the design for my Like a Boss DIY Zipper Pouch using PicMonkey, a online design and editing website/app. PicMonkey is awesome! I use it to edit all my blog photos and to create designs like the one used in this project.
Here's how to create your own design. On PicMonkey's homepage, hover over Design, then choose Custom. Set the size to 2550 x 3300 pixels, which is equal to a letter-size piece of paper.
Once that's set up, you'll see a bunch of option on the right side of the screen. Click Tt to add text. After you add the text you want, you can play around with colors, fonts, transparency, and other effects.

The other function I used to create my design was Overlays, which are various shapes and images. I used circles for the dots, but there are tons of other options, ranging from hearts to flowers and more. You can make the overlays different colors, play with transparency, or even upload your own overlays, such as photos.
I stuck to the basics for my pouch design, but PicMonkey has tons of other options, like backgrounds and textures. Have fun with it!
After you've created your design, click save to download the design to your computer as a JPEG.
Printing the Fabric
Print the Like a Boss printable on computer printer fabric using an ink jet printer.
Remove the paper backing and follow the package instructions to set the image on the computer printer fabric. Then, cut the fabric in half following the line in the middle.
Note: although my design is black and white, my print turned out grey. I've been having printer problems, so I decided to just go with it.

How to Make a Zipper Pouch
This pouch can be made in almost any size you want. For the purposes of this tuturial however, we're going to use a piece of 8.5 x 11-inch printer paper as a guide. Cut the paper in half, so that you have two 8.5 x 5.5-inch pieces (you'll only need one half).
If you're using your own material, fold it in half. Then, pin the 8.5 x 5.5-inch piece of paper to your material. Cut out the fabric, following out along the edges of the paper.
Use this same process to cut out two pieces of lining material. You should have four pieces of fabric at this point: 2 of the pouch material and 2 of the lining material.
Next, lay one of the pouch material pieces good-side up on a flat surface. Position the zipper face down on the fabric, aligned with the top edge. Place the right side of one of the lining pieces face down over the zipper and printed piece (see below).
Pin these layers together, then use your sewing machine to sew a straight line about ¼-inch from the edge.
If you don't have a sewing machine, you can hand sew the pouch using short, straight stitches.
Tip: computer printer fabric, and some other fabrics, are thin and transparent, so choose a lining that won't show through the fabric. If you want to make the Computer Printer Fabric sturdier and less transparent, reinforce it with Iron On Fusible Interfacing. I plan to do that the next time I make one of these zipper pouches so I can choose a colorful, printed lining.
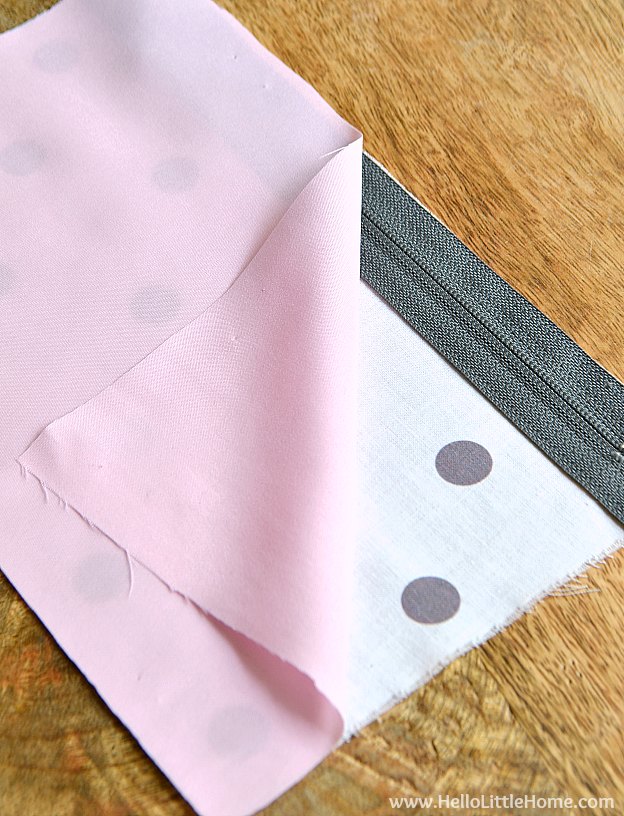
Fold the sewn seams over and press flat with your iron. It should look like the images below when you're finished.
Repeat this process with the remaining material:
- Position the remaining pouch material good-side up.
- Place the zipper face down on the fabric, aligned with the top edge.
- Place the right side of the lining piece face down over the zipper and printed piece.
- Sew together using a straight line ¼-inch from the edge. Open and press seams flat.
After the fabric has been attached to the zipper, double check that the zipper is sewn in properly.

Next, you'll sew the lining, as well as the outside of the pouch, together.
Unzip the zipper halfway. Then, fold one side of the printed fabric over so it lays face down on the other piece of printed fabric (printed sides together).
Do the same with the lining fabric, then pin everything together around the edges. (I forgot to take a picture of this, but it should look like the image below, except with pins around the edges.)
Important: make sure the zipper is unzipped halfway before proceeding!
Sew around the edges using a ¼-inch seam. When you get to the zipper, fold it toward the lining side. Leave a small opening (about 2-inches) on one corner of the lining.

Pull the bag through the opening in the lining; it should look like the top picture below.
Hand stitch the opening closed turning the raw edges toward the inside of the lining. Then, flip the back right side out, like the second picture below.
Press the seams flat with your iron.

That's it! Your pouch is complete.
These DIY Zipper Pouches are really easy to make using any fabric you like (quilting fabric would work great) once you get a hang of how the fabric is pieced together.
Okay, the DIY tassel charm is next!
Making the Tassel Charm
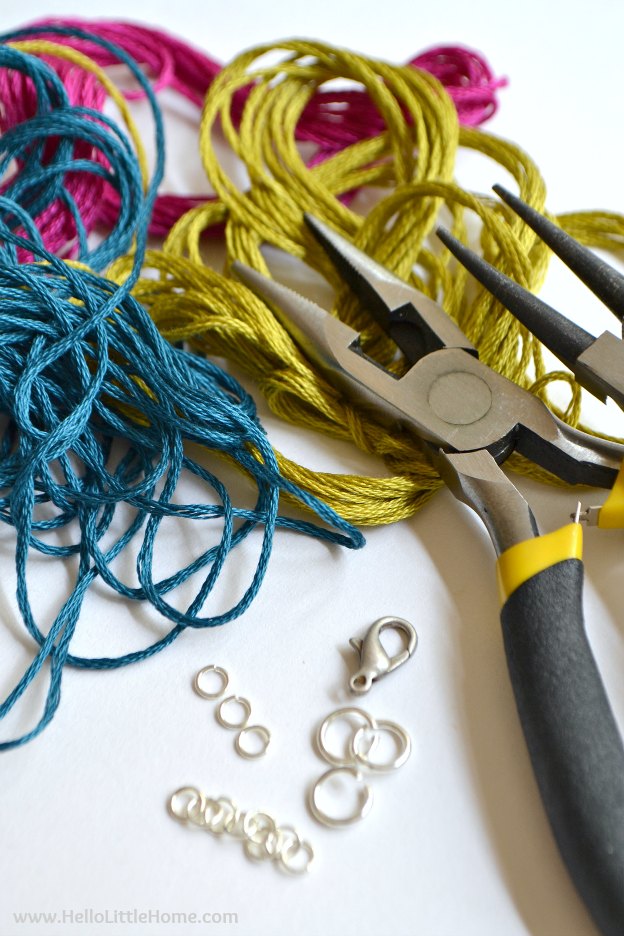
Here's what you'll need to make the DIY tassel charm for this DIY Zipper Pouch:
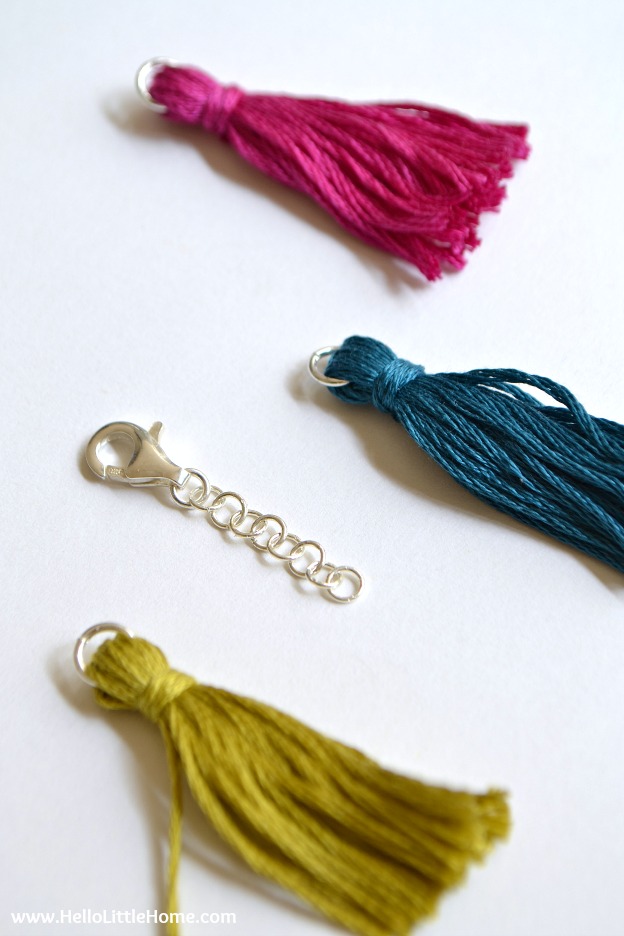
- embroidery floss (I used three different colors.)
- 5 mm open jump rings (three)
- round nose pliers
- flat nose pliers
- scissors
- 3 mm open jump rings (four)
- 1-inch piece of chain (purchase premade chain or make one using 3mm jump rings)
- 12 mm lobster clasp (one)
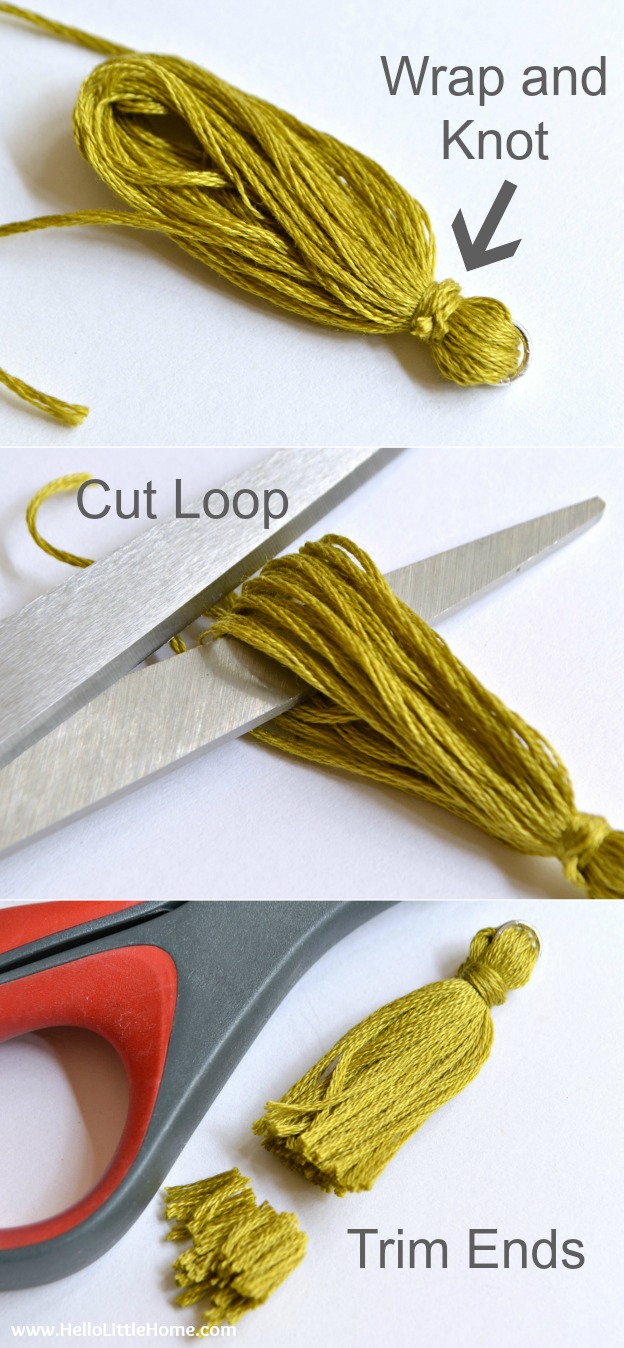
To make a tassel, wrap the embroidery floss around a 2-inch piece of cardboard 20 times.

Open a 5 mm open jump ring using the pliers. Slide the wrapped floss through the jump ring's opening.
Close the jump ring, then pull the ring up to the top of the cardboard.
Tip: here's how to properly open and close a jump ring, if you're not sure.

Carefully, slide the embroidery floss off the cardboard, then follow these three steps to finish the tassel:
- About ¼ inch from the jump ring, wrap a separate piece of floss around the tassel 4 to 5 times. Tie the ends closed with a double knot and trim closely.
- Slide the scissors in between the looped end, then cut through the bottom of the loop.
- Trim the ends of the tassel so they are even.
Repeat these steps two more times to make three tassels.
Use the pliers to attach a lobster clasp to the chain using a 3 mm open jump ring.
Attach each tassel to the chain using a 3mm jump ring.

I attached the bottom tassel first, then the middle tassel, and finally the top tassel.
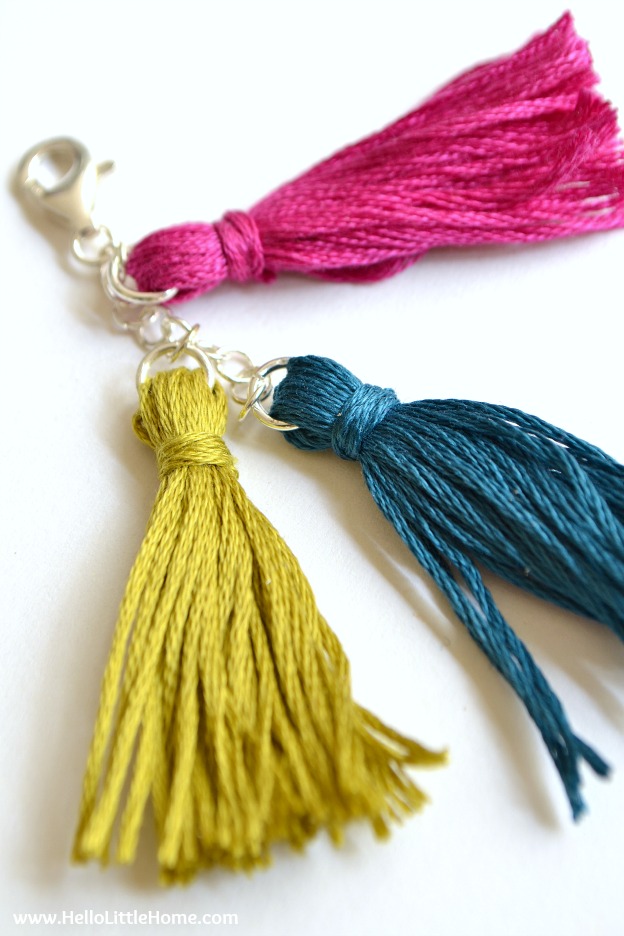
Clip the tassel charm onto the zipper, and your Like a Boss DIY Zipper Pouch is complete!

Wasn't that easy? If you make a pouch, please let me know ... I'd love to see how it turns out!

Printable Pouch Files
Access the free printable files by clicking the images below.
There are two files to choose from: one has Like a Boss on the front and polka dots on the back; and the other has polka dots on both sides.


For best results, print the PDFs at full size (do not shrink to fit the page).
Also, as I mentioned earlier, my printer printed these black and white images grey.

What craft projects have you been working on lately?
What a cute bag and you've made it super easy to make by sharing your designs to print.