Celebrate someone special with an easy pink and gold birthday party!
This post contains affiliate links.
Easy Pink and Gold Birthday Party
It's my birthday!
To celebrate, I'm bringing you a fun series of posts all week long, starting with this easy pink and gold birthday party idea.
You may have noticed that I love decorating, and coming up with creative party and decor ideas definitely goes along with that. For birthdays past, I've celebrated with a French Theme (still a fave), a Fiesta Theme, and many more festive ideas.
This year, I was inspired by two of my favorite colors: pink and gold!
Pink and Gold Decor Ideas
I love the combination of pink and gold. It's girly, a little glitzy, and oh so fun ... absolutely perfect for a party!
Keep reading to learn all about how I created this easy pink and gold birthday party, from decor ideas to DIY projects to my chocolate sweets table. Yum!

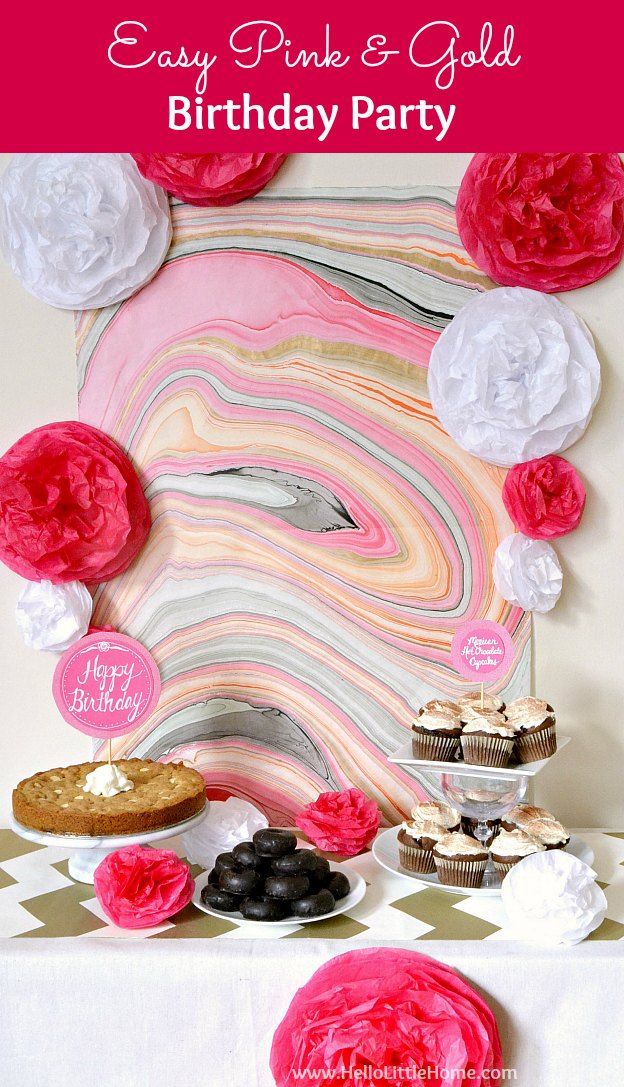
Let's start with the decor for this pink and gold birthday party. I didn't want to spend tons of money, but I still wanted to do something super festive.
My inspiration was this stunning pink and gray marble paper from Paper Source. I'm kind of obsessed with it! Each piece has a unique swirling texture.
Don't like pink? Check out Paper Source's website for lots of other marble paper options, including this same pattern in a gorgeous black, gold and silver color scheme.
Since the paper was so eye-catching, I decided to use it as the backdrop for my table. I only needed one sheet for my small space, but if you have a larger table, line up multiple sheets of this pretty paper behind it.
You could even frame the paper for a more finished look.

I hung the paper with a few pieces of clear tape, then surrounded it with oversized DIY Tissue Paper Pom Poms.
These poms were so simple to make (more info below), and I love how they created a focal point for my table, along with the marble paper.
I also hung a pom on the front of my table and scattered smaller poms across the top.

I covered the table with a canvas drop cloth, then ran a gold chevron table runner down the middle.
Unfortunately, I can't find the exact table runner I used, but this one looks fairly similar.
You could also make your own from this gold chevron paper, get this gold sequin chevron runner (or go full on sequins) for extra bling, or do gold stripes or a confetti pattern.
Lots of options, and they'd all look great!

I love how the gold in the table runner brings out the gold in the marble paper. It's so festive and fun!

Pink and Gold DIY Ideas
Of course, no party of mine would be complete without a DIY project or two, and this easy pink and gold birthday party features a few!
My favorite project for this party was the Tissue Pom Poms.
They were so fun to make, and they add tons of texture and dimension, too.

These poms are so simple to make. Basically, you stack tissue paper, staple the layers together, then do lots of scrunching.
Make sure to check out my easy Tissue Paper Pom Poms tutorial.
The best thing about these tissue paper poms is that you can make them in any size or color. Think of the possibilities!

The other project I made for my party was this cute DIY Happy Birthday Cake Topper.
It was the perfect addition to my cookie cake!

This DIY Happy Birthday Cake Toppers is simple to make in any size, shape, or color.
To make your own, first find a round bowl or glass that's the size you'd like your topper to be.
Place the bowl face down on a piece of card stock, then trace around it. I used this vibrant fuchsia card stock.
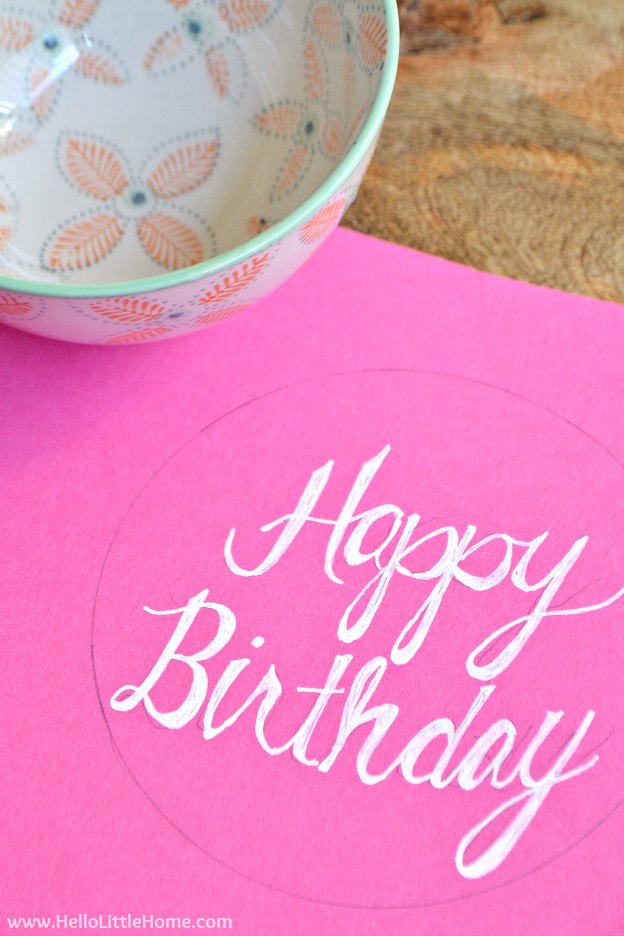
For the lettering, I lightly wrote Happy Birthday in the circle using a pencil.
When I was satisfied with how the letters looked, I went back over the lines once with my fave Uni-Ball White Gel Pen. Once the ink has dried, you can erase any pencil marks that are still showing.
Then, to give it a hand lettered look, I went back over the letters again, thickening all the down strokes.
I also added a simple design around the edge of the circle.

To assemble the topper, cut out a larger circle of decorative paper, and attach it to the back of the smaller circle using double sided tape.
Finally, tape a bamboo skewer to the back of your topper with clear tape.
Tip: if both sides of your topper will be visible, sandwich the skewer in between the two paper layers instead.

I also made a smaller topper for my Mexican Hot Chocolate Cupcakes.
Isn't it cute?

It's these little touches that will help pull your whole party together!

Food Ideas
It isn't a party without great food, and this easy pink and gold birthday party was no exception! I'm a huge chocolate lover, so I decided to do a chocolate sweets table.
When you're setting up a food table, try to use varying heights. This will help create interest and keep your table from looking too flat.
I like to set out my serving dishes first (sans food), then move things around until I like how it looks. I'll also add risers and other stands, if needed, along the way.
On the left side of my table, I used a short marble cake stand for my cookie cake. In the middle, I placed a low platter of donuts, and on the end I have a tall cupcake stand.
The varying heights kept the display interesting and my guests' eyes moving across the table.

If you're like me and don't have a lot of serving pieces, don't despair. An easy trick for creating a tall stand is to place a glass jar in the center a large plate, then top the jar with a smaller plate.
This created an instant tall cake stand which was perfect for showing off my cupcakes and creating those varying height layers.
Okay, enough about the display ... let's get to those chocolate desserts!
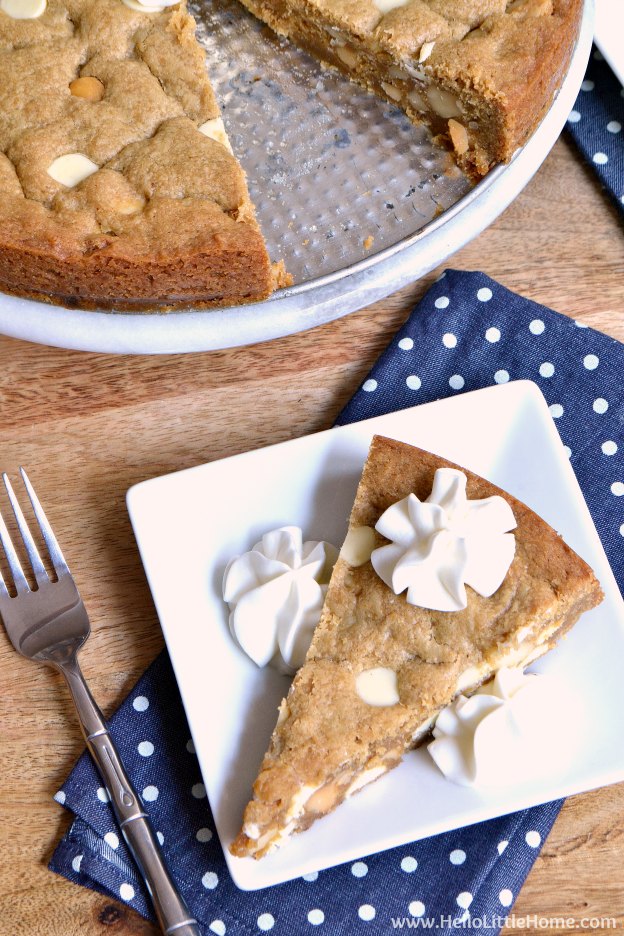
The star of my dessert table was this White Chocolate Macadamia Nut Cookie Cake ... you guys, it was seriously a.ma.zing!
I've always wanted a cookie cake for my birthday, and this was finally the year my dreams came true (ha). You have to try this recipe. It's rich, decadent, and a hit with everyone who tries it.
Check out my roundup of over 70 Birthday Cake Alternatives for even more creative "cake" ideas!
I also made these yummy Mexican Hot Chocolate Cupcakes.

Have you ever had Mexican Hot Chocolate? It has a depth of flavor and a touch of heat that's totally unique and delicious.
Since I put most of my effort into my cookie cake, I cheated a little on these Mexican Hot Chocolate Cupcakes. Here's what you'll need to make them:
- 1 box chocolate cake mix, plus ingredients to prepare it as directed (eggs, oil, etc.)
- 2 tsp. cinnamon, plus extra for serving
- ¼ tsp. cayenne
- 2 containers cream cheese frosting
To make the Mexican Hot Chocolate Cupcakes:
- Prepare the cake mix as directed, adding the cinnamon and cayenne along with the other ingredients.
- Pour the mix into a lined cupcake pan.
- Bake according to package directions.
- Let cupcakes cool completely, then frost generously.
- Sprinkle cinnamon over the frosting. Tip: if you sprinkle the cinnamon through a fine mesh strainer, it will be look more even.
Don't they look delish? They really were ... and easy, too!

I also served some chocolate covered donuts ... who can resist those?
Here are more delicious chocolate recipes that would be perfect, too:
- Strawberry Dark Chocolate Bark
- Candy Covered Ice Cream Sundae Bar
- Chocolate Dipped Shortbread Hearts
- Chocolate Covered Strawberry Parfaits
- Heart Sandwich Cookies with White Chocolate Cream Cheese Filling
- Mini Chocolate Chip Cheesecake Cupcakes
- Raspberry White Chocolate Bread Pudding
When it comes to drinks, my Raspberry French 75s or Spicy Palomas would both be delicious, plus they're pink. For something nonalcoholic, you could make Strawberry Lemonade, or continue the chocolate theme with my Mexican Hot Chocolate.

Whatever you serve, this easy pink and gold birthday party is sure to be a hit!

What is your favorite way to celebrate your birthday?
P.S. Love this post? Check out all of my party ideas here!
Cute Pom Poms and that marble paper is a showstopper! Love your ideas!