Bake a batch of these Sour Cream Cut Out Cookies today ... they're soft and chewy, super delicious, and so easy to make!

This post contains affiliate links. As an Amazon Associate I earn from qualifying purchases.
Are you looking for a new recipe to add to your Christmas cookie rotation? Then, you need to try these Sour Cream Cut Out Cookies!
I found the recipe for these old fashioned Rolled Sour Cream Cookies in my mom's cookbook. The recipe comes from a family friend, and I made a few little tweaks to the method and swapped out the shortening (which I pretty much never use) for butter.
These delicious cookies are a unique alternative to traditional sugar cookies. And if you ask me, they taste even better than the classic! I've never been a huge fan of sugar cookies (they're kind of bland), but the sour cream gives these cookies a slight tang, and they're perfectly soft and chewy. So delish!
I'm also sharing two recipes for decorating the cookies, both of which are quick and easy to make. A scrumptious Sour Cream Frosting (that will melt in your mouth) ... best if you want to frost the cookies quickly or are making them with kids. And a simple Icing recipe that's an easy alternative to royal icing ... perfect if you want to get a little more creative.
Ready to try these yummy cookies for yourself? Keep reading for the recipe and lots of fun tips!
Jump to:

Ingredients
This Sour Cream Cookies recipe uses really basic ingredients. You probably have almost everything in your pantry already! Here's what you'll need:
- Sour Cream - Use full fat for the best results. Daisy is my favorite!
- Flour - You'll also need some all purpose flour.
- Butter - This recipe uses unsalted butter.
- Sugar - You'll also need some granulated sugar.
- Vanilla - A little vanilla extract adds a classic cookie flavor.
- Eggs - This recipe uses large eggs.
- Leavener - Get out the baking soda and baking powder. You'll need both.
- Salt - I prefer to use Kosher Salt.
- Decorating - You can make this recipe with Sour Cream Frosting or Cookie Icing, and you'll find recipes for both below. It's also fun to decorated the cookies with sprinkles!
You'll Also Need
To make this recipe, you’ll need a stand mixer to prepare the dough, a rolling pin, a couple baking sheets, and a baking rack to cool the finished cookies. I used this Christmas cookie cutter set. It's super affordable, and it has every cookie cutter you could ever need (plus some you didn't even think of)!
If you choose to ice these cookies, you'll also need some squeeze bottles to hold and apply the icing. I used a decorating bulb for the thicker icing, and a few of these squeeze bottles for the thinner colored icings.

How to Make Sour Cream Cut Outs
Okay, let's get started! This cookie dough is quite simple to make. You'll find a detailed recipe card below, but here's an overview of the steps:
- Combine dry ingredients. You'll start by whisking together the dry ingredients: flour, salt, baking soda, and baking powder. Once everything is mixed, set it aside for the moment.
- Mix butter, sugar, vanilla, and eggs. Next, get out your stand mixer and mix together the butter and sugar. There's a lot of sugar in relation to the butter, so it won't get super creamy ... just make sure it's well mixed. Then, blend in the vanilla extract and the eggs (one at a time).
- Add sour cream and dry ingredients. The last step is adding the sour cream and the flour mixture. You are going to alternate them. So mix in half the sour cream, then half the flour. Repeat with the remaining sour cream and flour, mixing just until everything is well combined.
- Chill dough. When the dough is finished, divide it half. Use your hands to shape each half into a ball, then flatten the balls into disks (about one-inch thick). Wrap the disks with plastic wrap, then chill them for two hours (or more). Tip: This cookie dough is very soft, so you MUST chill it for at least two hours (I actually refrigerated mine overnight). If you don't chill the dough, the cookies won't hold their shape.
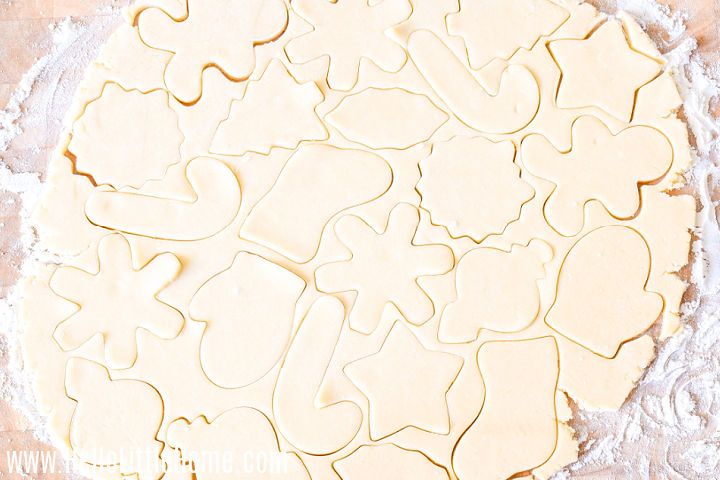
- Roll + cut out cookies. After the dough has chilled, roll it out about ¼-inch thick on a lightly floured board. Then, use your cookie cutters to cut the dough. I'd recommend re-rolling the scraps no more than once. Tips: You should be able to get about four to five dozen cookies, but it will depend on how thickly you roll out the dough, how large your cutters are, and how closely you cut the cookies. Dip your cookie cutters into a little flour before cutting the cookies. This will help keep the dough from sticking to the cutters.
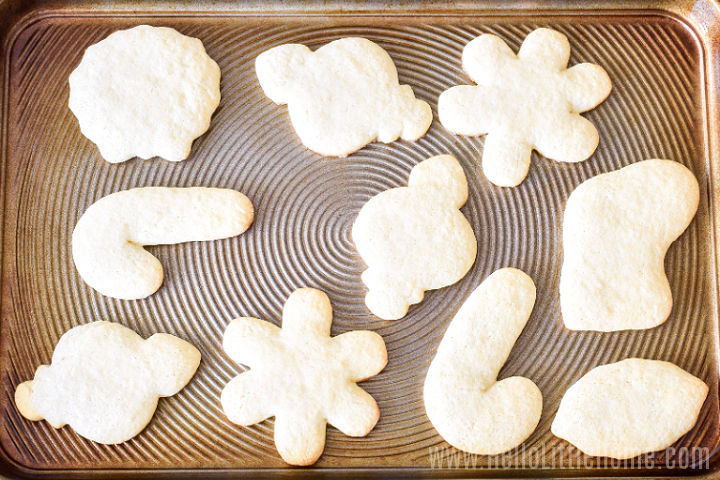
- Bake. Transfer the cookies to a baking sheet. I recommend spraying it with nonstick cooking spray first, although you could use parchment paper. Then, bake the cookies until they're golden brown on the bottom. It only takes about eight minutes.
- Cool + decorate. Let the cookies cool on the baking sheet for five minutes or so, then transfer them to a baking rack to cool completely before decorating.

Decorating the Cookies
You can decorate these Rolled Sour Cream Cookies with frosting (super easy) or with icing (a bit more labor intensive). I've included recipes for both, so choose your fave.
Sour Cream Frosting
The Sour Cream Frosting I created for this recipe uses simple ingredients, it's easy to make, and it's so light and fluffy. About the frosting:
- Amazing Flavor + Texture - It literally melts in your mouth, and the subtle tang complements the cookies so well!
- Coloring the Frosting - I used white frosting, but you can easily color it with food coloring, if you prefer. This gel food coloring is my fave, and a little goes a long way.
- Sprinkles Are a Must - I used a combination of clear, red, and green sparkling sugar, red and white nonpareils, red hearts, and rainbow sprinkles. So fun!
- Perfect for Kids - This frosting is easy enough for kids to use!
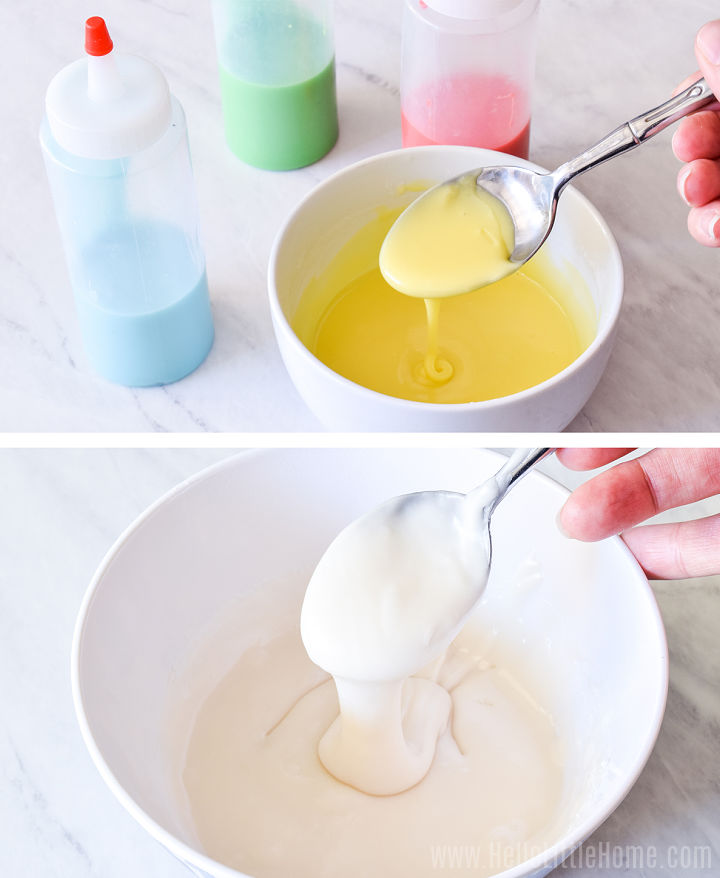
Easy Cookie Icing
The easy Cookie Icing I created for this recipe is similar to royal icing, but it's not as fussy to make. About the icing:
- Only Three Ingredients - Powdered sugar, milk, and vanilla extract! Non-dairy milk works fine, too (I used coconut milk, which was delish).
- Make Multiple Batches - You will need to make two batches of icing (or more, depending on how many colors you'd like to use): a thicker icing for the lines around the cookies; and a thinner icing for coloring the cookies. The thicker icing holds the thinner icing in place, and the only difference between them is that the thicker icing has less milk in it.
- Helpful Tools - I used a decorating bulb to hold the thicker icing, and a few of these squeeze bottles for the thinner icings (perfect because you can see the colors). You could also use decorating bags, of course, but these bottles / bulbs are much easier to handle in my opinion.
- Good for Older Kids - I probably wouldn't use this icing with young kids, unless you don't mind a big mess. But I think older kids with a little more patience (and a creative streak) would probably get a kick out of decorating cookies this way!
How to Use the Icing
- Outline the cookies. Start by outlining the cookies with the thicker icing. I used white for my lines, but you can color the icing if you prefer. This Wilton gel food coloring is my favorite. (I went for more pastel colors here, but you can definitely get deeper, more traditional colors with this set, too.)
- Flood the cookies. Next, you'll flood (fill in) the cookies in with the thinner, colored icing. You want to strike a balance between covering the cookies without adding so much icing that it overflows the outline.
- Spread the icing. Use a toothpick to gently spread the icing into any hard-to-reach corners.
- Add decorations + sprinkles. Another thing that's fun to do: adding some decorative dots on the cookies (check out the tree and star cookies below). I added those with the thicker icing after coloring them. If your dots come out a little pointed, just wet your finger, then lightly press them down into shape. If you'd like to add sprinkles, make sure to add them while the icing is still wet to the touch.
- Let the cookies dry. Once you finish icing the cookies, let them sit out to dry. Like I mentioned earlier, this can take up to 24 hours. You can speed this up by refrigerating the cookies (in a single layer), but it will still take a few hours. Don't worry though, you can definitely eat the cookies before the icing completely hardens. And they are delicious!


Storing the Cookies
Store these Sour Cream Cut Out Cookies in an airtight container. They'll stay fresh for about a week (if they last that long0! You can also freeze the cookies. Freeze them in a single layer first, then transfer them to a storage container using parchment or waxed paper between the layers of cookies.

Related Recipes
Looking for more Christmas Cookies? If you like cut out cookies, make my Honey Cookies or Classic Gingerbread Cookies (or maybe these Stamped Cookies) next! You'll love these other cookies, too:
- Chocolate Peppermint Crinkle Cookies
- Maple Pecan Shortbread Cookies
- Peppermint Thumbprint Cookies
- Black Bottom Cupcakes (Mini Chocolate Chip Cheesecakes!)
- Poppyseed Kiss Cookies
- Chewy Ginger Cookies
- White Chocolate Cranberry Cookies
- Curry Shortbread Cookies
- Pecan Finger Cookies (My all-time favorites!)


Sour Cream Cut Out Cookies
Ingredients
For Cookies:
- 3 ½ cups all-purpose flour
- 1 teaspoon kosher salt
- ½ teaspoon baking soda
- 2 teaspoons baking powder
- ⅔ cup unsalted butter, at room temperature
- 1 ⅔ cup granulated sugar
- 1 teaspoon vanilla extract
- 2 large eggs
- ½ cup sour cream
- nonstick cooking spray
For Sour Cream Frosting:
- ½ cup unsalted butter, at room temperature
- ⅓ cup sour cream
- 1 teaspoon vanilla extract
- ¼ teaspoon kosher salt
- 3 cups powdered sugar
- food coloring
- sprinkles
For Icing:
- 1 cup powdered sugar
- 1 to 3 tablespoons milk
- ¼ teaspoon vanilla extract
- food coloring
Instructions
Prepare Cookies:
- Whisk together flour, salt, baking soda, and baking powder in a medium bowl. Set aside.
- Using stand mixer, mix together butter and sugar. Add vanilla extract and eggs (one at a time).
- Mix in ½ the sour cream, then ½ the flour. Repeat with remaining ingredients.
- Divide dough in half, then shape each half into a ball. Flatten balls into disks about 1-inch thick. Wrap disks in plastic wrap, then chill for at least 2 hours (or overnight).
- Preheat oven to 375°F (190°C). Lightly spray two baking sheets with nonstick spray.
- Using rolling pin, roll out one disk of dough about ¼-inch thick on a lightly floured board.
- Use cookie cutters to cut dough, then transfer cookies to baking sheet, spacing at least 1-inch apart.
- Bake cookies for about 8 minutes, or until cookie bottoms are golden brown. Let cookies cool on pan for 5 minutes, then transfer to a baking rack to cool completely.
- Once cookies have cooled, decorate with frosting and sprinkles, or icing. Enjoy!
Prepare Frosting:
- Using stand mixer, mix butter until smooth. Add sour cream, vanilla extract, and salt.
- Mix in powdered sugar until smooth. Add food coloring, if desired.
- If frosting is too thin, add more powdered sugar until frosting reaches desired consistency. If frosting is too thick, add additional milk (a drop or two at a time), until frosting reaches desired consistency.
- Spread frosting over cookies with a butter knife or small offset spatula. Add sprinkles, if desired.
Prepare Icing:
- Combine powdered sugar, milk, and vanilla extract in a small bowl, mixing until smooth. Add food coloring, if desired.
- For thick icing (for lines), you will need about 1 to 1 ½ tablespoon milk. The consistency should be barely pourable. For thinner icing (used to flood cookies), you will need about 1 ½ to 2 tablespoons milk. Start with the smaller amount of milk, then add more (a few drops at a time) to reach desired consistency. If icing gets too thin, just add more powdered sugar.
- Transfer finished icing to decorating bulbs or squeeze bottles. Outline cookies with thick icing first, then fill in with thinner icing.
- Let icing harden before storing cookies. It can take up to 24 hours (chill cookies in refrigerator to speed up process).
Notes

The flavor of this cookie is amazing. And that was before the frosting. However, the amount of the flour listed is in no way even close to what is needed. I couldn’t believe the extra flour I had to use just to keep the dough from sticking to the rolling pin, the counter, the cookie cutters, my hands Stickiest dough I’ve ever worked with. I would venture to say I added at least another cup while rolling out.
Hi Kristi! I'm glad you enjoyed the cookies. It's sounds like something went amiss when you were making the dough, because you shouldn't need to add extra flour. Did you chill the dough for 2 hours before rolling it out? The dough is very soft, so it's essential to chill it. I'm happy to help troubleshoot 🙂
I’m having the same trouble-stickiest dough ever. I keep looking back at the recipe thinking that I missed something. I roll it out, cut out 8 cookies, put the dough back in the refrigerator. I have SO much flour on the counter and rolling pin. It’s a bit of a disaster.
Hi Kerri. I'm sorry this isn't working out for you. It sounds like you either didn't add the full 3 1/2 cups of flour when making the dough, or you aren't refrigerating the dough for long enough. The dough needs to be chilled for at least two hours so it has time to firm up before rolling it out.
Is there supposed to be milk in the sour cream frosting recipe?
Hi, Jan! There is no milk in the frosting recipe, as the sour cream helps create the right consistency. However, if you want to adjust the consistency, you can do that by adding more powdered sugar (if it's too thin), or by adding more sour cream (or a drop or two of milk). I haven't found this has been necessary though.
have used the same cutout recipe since the 70s. It’s no fail but contains crisco. I was wanting to try a sour cream recipe but was nervous in case they didn’t turn out. I just want to say these baked up beautifully! Perfect texture and easy to handle. (As easy as cut out cookies go). 😊 This recipe is a keeper!!
Hi Michelle! I'm so glad you enjoyed the recipe. Happy Holidays!
I just made this dough and it is too runny, what do I do" I had to substitute Crisco for butter
Hi, Vicky. I'm sorry the recipe didn't turn out for you. The dough should not be runny when mixed. The Crisco may have contributed, but I'm guessing that you didn't add enough flour. The dough also needs to be chilled before rolling, which helps firm it up more. I hope that helps and that you'll give the recipe a second chance 🙂